Publish date:
Your business teams might be handling your project processes well, but what happens when a customer has a question or a problem? Are you ready to address these concerns effectively?
JIRA Salesforce integration can help. It allows you to manage two crucial tasks simultaneously.
This blog will share everything you need to know about this integration. Let’s get started!
What are JIRA and Salesforce?
JIRA is a cloud-based tool for managing projects. It helps teams from different departments work together and share insights before, during, and after a project. JIRA provides a centralized view of all project activities, keeping everyone informed and up-to-date. You can plan, prioritize, and track tasks to ensure timely and efficient delivery to clients.
Salesforce is a customer relationship management (CRM) software that supports businesses of all sizes and industries. It provides a single location to store all customer data and interactions, enabling you to build lasting relationships with your customers. The platform is customizable, allowing you to tailor it to meet your specific business needs.
8 Features Of JIRA Software

JIRA offers numerous features that help businesses enhance their project management.
Here are some key features:
1. Scrum And Kanban Boards
These boards let you view your teams on a single platform. They also allow teams to see what their peers are working on.
The boards use an agile method to track projects from start to finish. It includes setting specific goals, assigning tasks, and outlining the workflow to ensure a clear and organized approach.
JIRA has two types of boards: Scrum and Kanban. Scrum boards help teams manage complex projects by breaking them into smaller tasks called sprints.
Kanban boards are visual tools for organizing and managing work. They divide tasks into four categories: Backlog, Doing, Review, and Done. This setup enables teams to view the status of a task. It also visualizes workflows, prioritizes tasks, reduces work in progress, and improves efficiency.
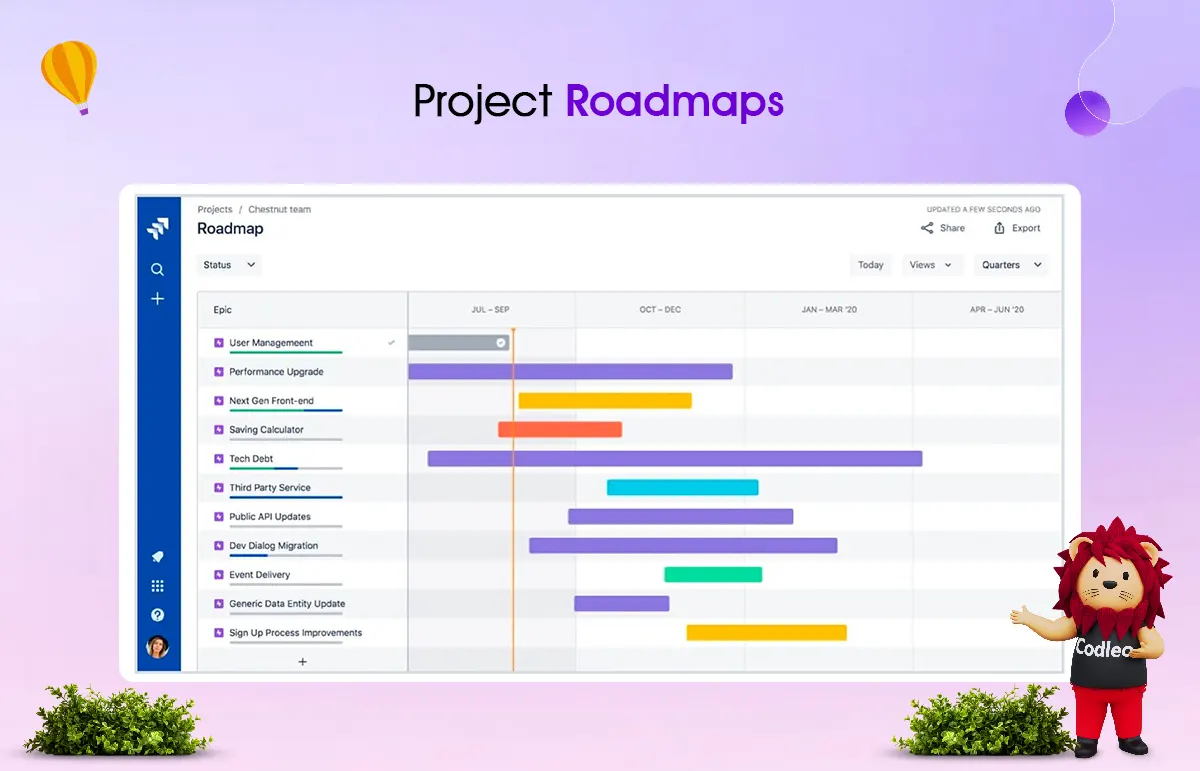
2. Project Roadmaps
This valuable feature of JIRA highlights the project's progress and identifies issues or risks that are causing delays.
It helps stakeholders and team members quickly understand the project's context and timeline, keeping them informed about its status.
The project roadmap includes essential details such as tasks, milestones, timelines, due dates, risks, roadblocks, and necessary resources. With this information, you can create a list of goals to guide your team's efforts. Additionally, it connects all your teams, improves communication, and tracks progress throughout the project.
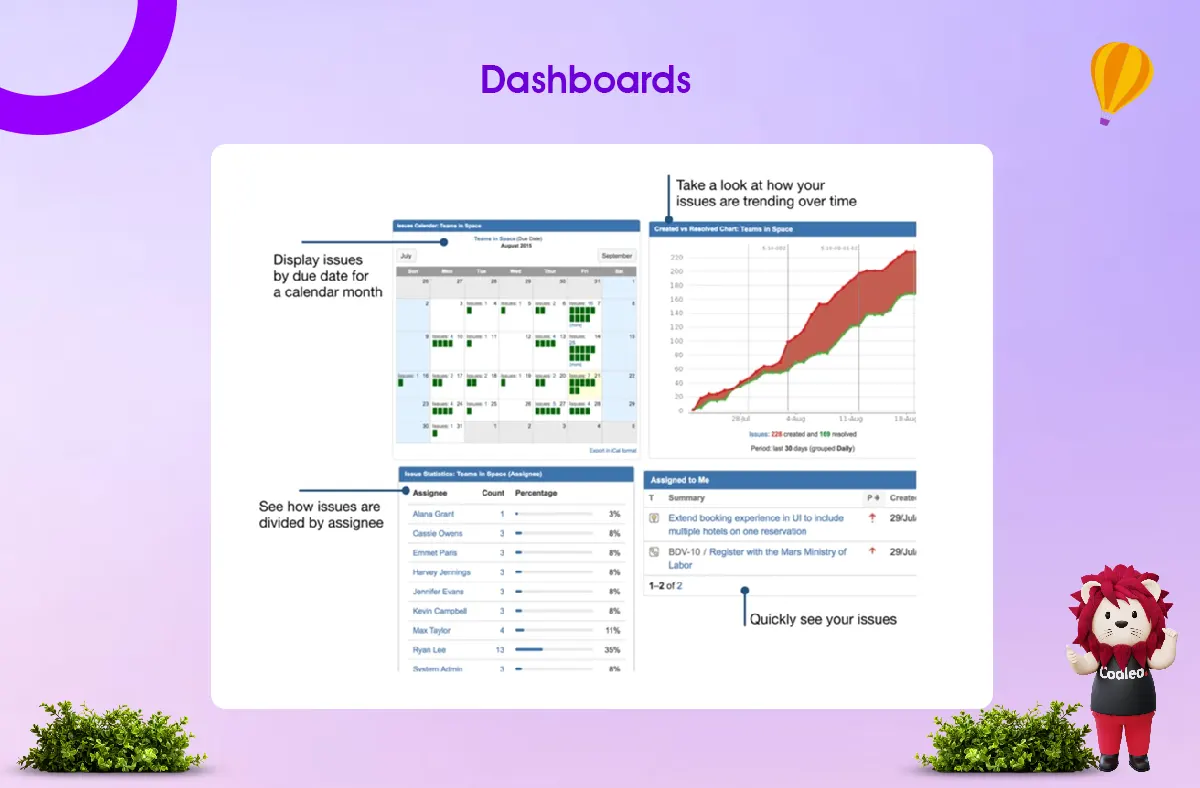
3. Dashboards
JIRA dashboards provide a clear view of your project’s status.
You can view the issues, projects, or sprints currently in progress, along with the steps to take and the requirements to complete them.
Additionally, dashboards make it easy to share information with your teammates and others.
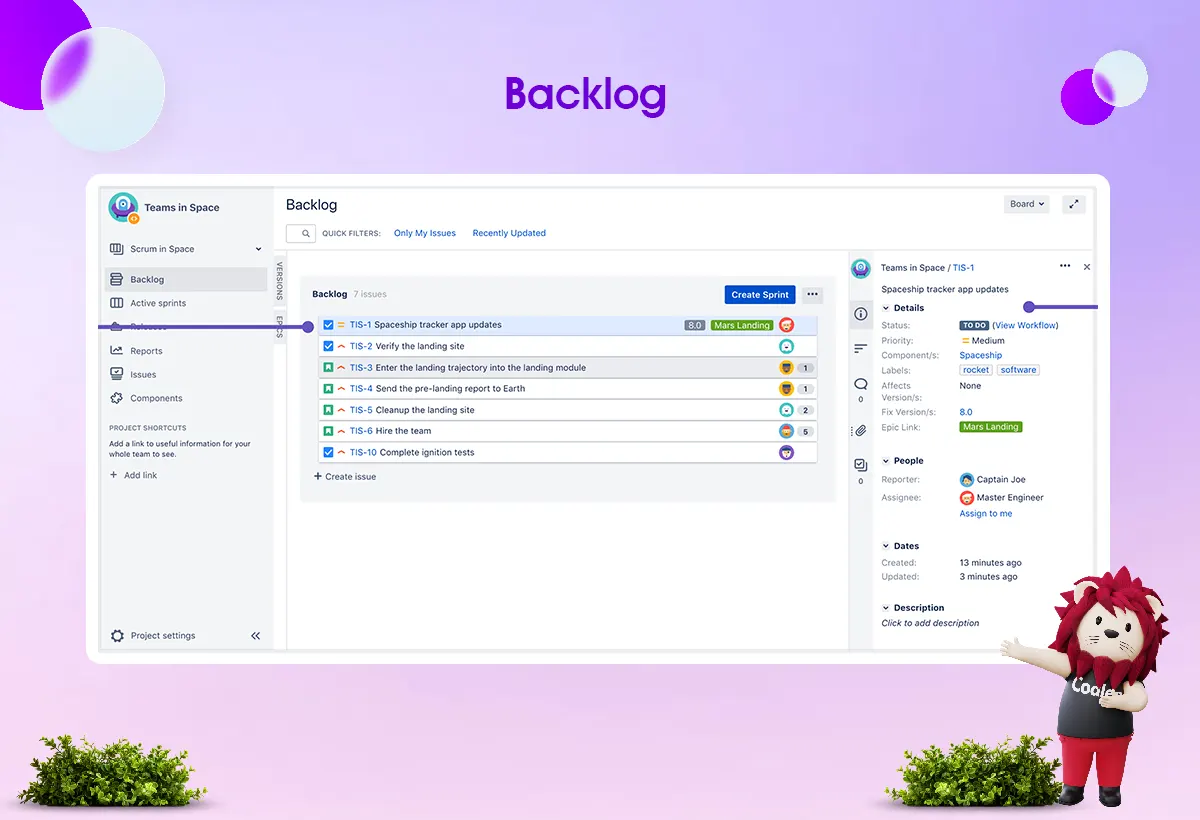
4. Backlog
JIRA has a feature that helps you prioritize tasks and choose which ones to focus on in the next sprint. It offers a single list view, allowing you to easily organize, update, sort, and prioritize your work.
In this view, your team can see all current issues and future issues they plan to work on. This clarity helps team members focus on the most critical tasks when they're ready.
You might wonder if Kanban does the same thing. While Kanban boards don’t require a backlog, using the backlog view keeps your Kanban board’s to-do columns clear for other activities.
The backlog feature works best for teams using Scrum-style boards.
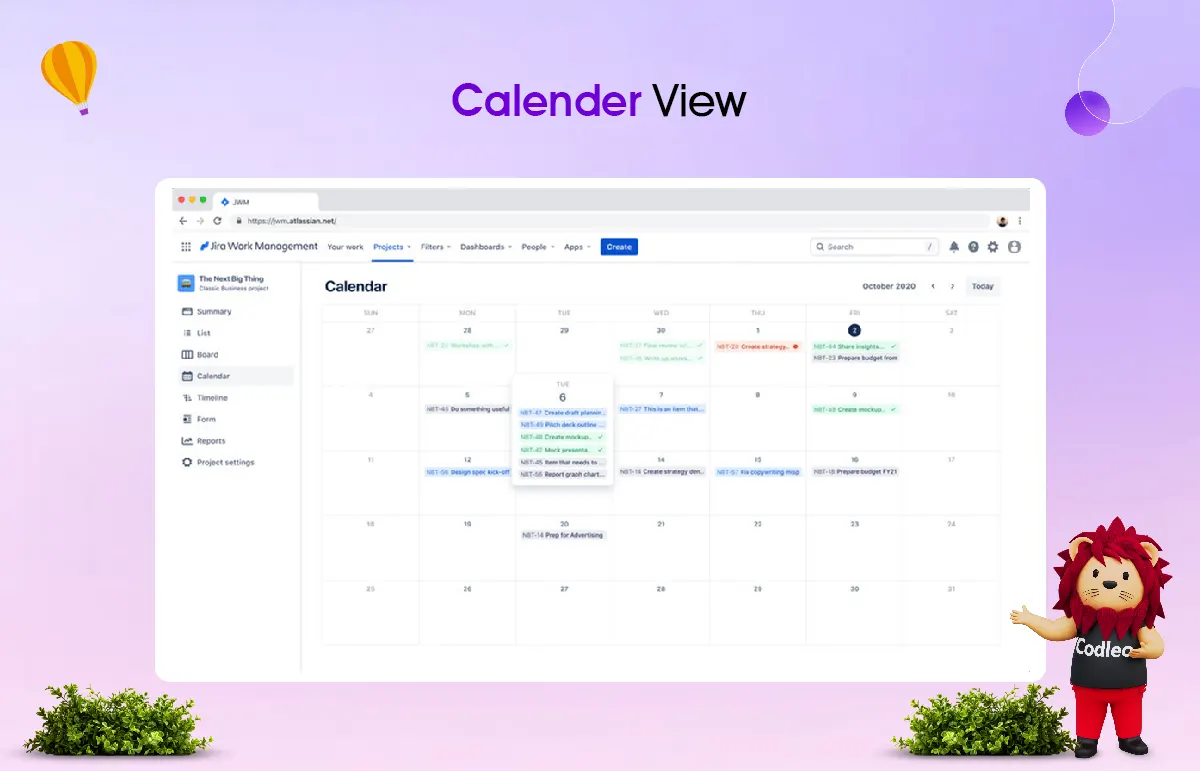
5. Calendar View
JIRA's calendar functions similarly to the one on your phone or at home, but it offers distinct features.
In this calendar, you can organize your projects, tasks, and activities for the day, week, or month ahead. It helps you identify tasks that need attention, reminds you of important deadlines, and keeps you on track.
6. Automation And Workflows
JIRA automates processes, routine tasks, and workflows, such as approvals. It means that things continue to work smoothly even when no one is present. As a result, your team can spend more time on essential matters, which enhances productivity.
You can choose from many templates or create your automation workflow without needing to code. You won't have to worry about errors.
This feature makes JIRA a user-friendly and scalable option for software development teams.
7. Mobile Compatibility
JIRA works on both on-premise and cloud systems. It also has mobile apps for Android and iOS devices. It makes it easy for your remote teams to work quickly from different locations.
8. Integrations
JIRA can easily connect with over 3,000 popular software tools, like Salesforce, GitHub, Zendesk, and Confluence.
However, JIRA is not a built-in project management tool for Salesforce. To link JIRA with your Salesforce account, you need a third-party connector.
We will explore how to integrate JIRA with Salesforce and the benefits it can bring to your business.
-
Also Read: COMPLETE GUIDE TO SALESFORCE CTI INTEGRATION
Step By Step Guide On How To Integrate JIRA With Salesforce
To connect JIRA and Salesforce, you can use a connector that simplifies the integration between these two platforms.
Salesforce recommends using Mulesoft Anypoint Studio for this integration.
Now, let’s look at the steps:
Step 1. Set Up Connection Flow:
-
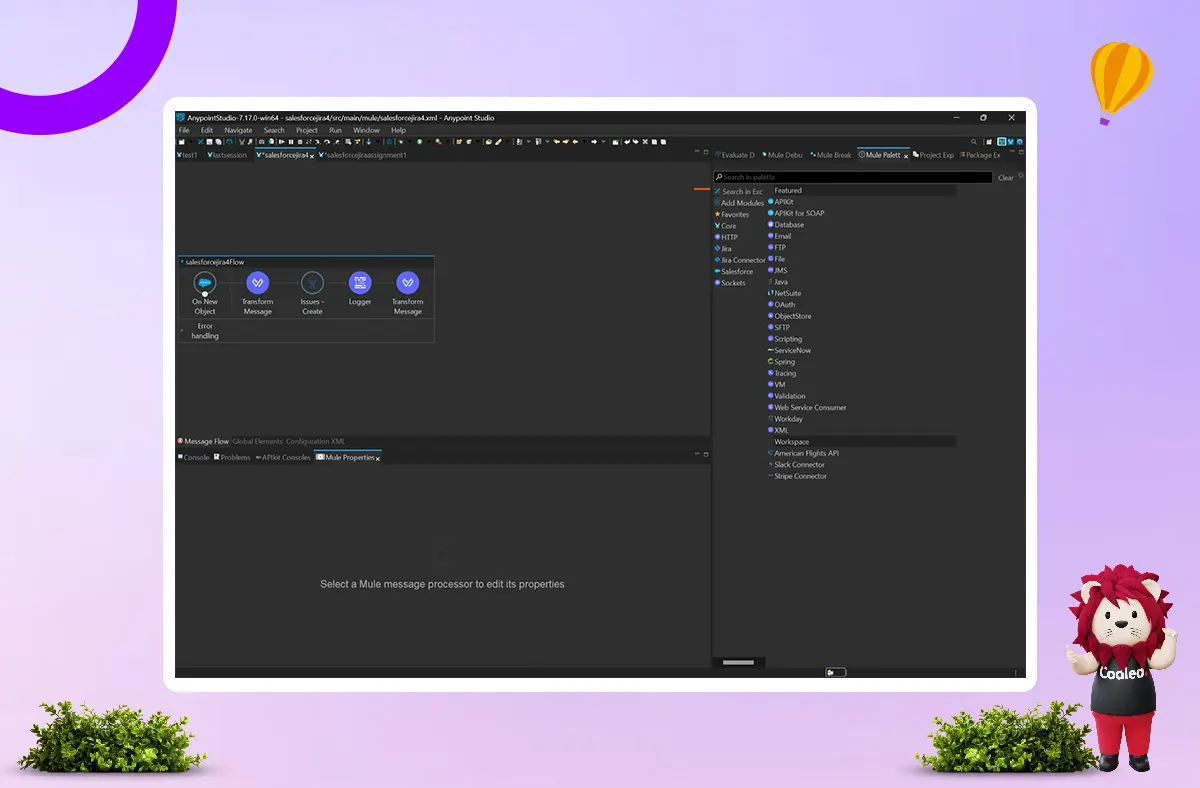
1.1. Open Anypoint Studio: In Studio, create a new Mule project in which we will add and configure the connector.
-
In Studio, select File > New > Mule Project.
-
Enter the name for your Mule project and click Finish.
-

-
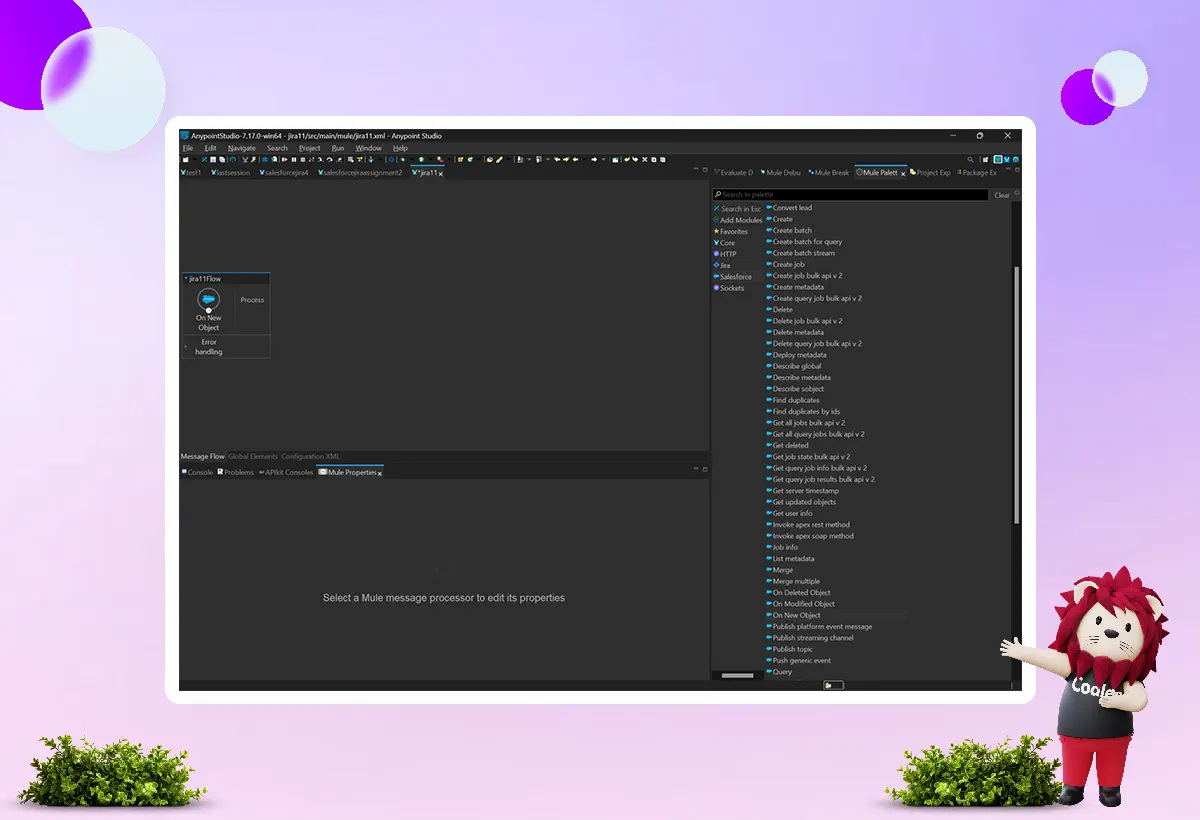
1.2. Go to the Mule palette and add new Salesforce object components.

-
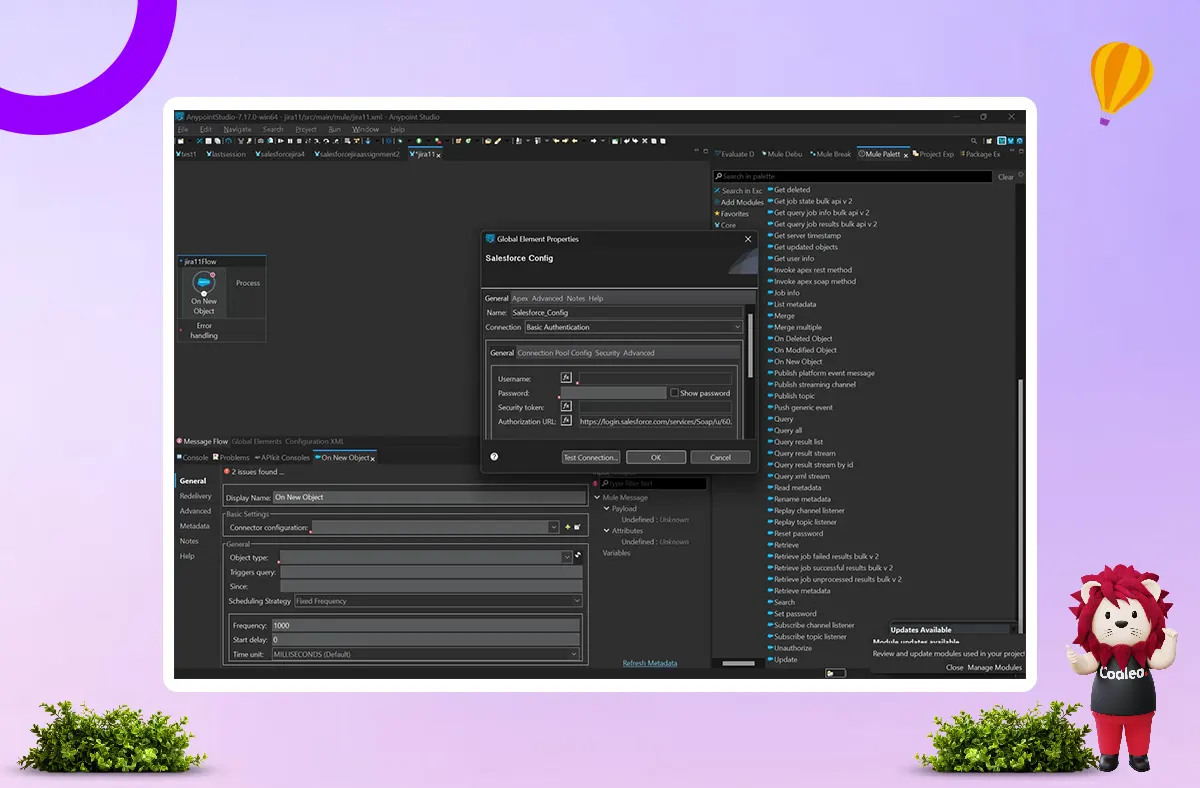
1.3. Configure the On New Object component:
-
Here, we are doing this through a basic authentication.
-
Click the (+) icon on the Connector Configuration tab and fill in the details.
-
1.4. Now enter your details:
-
Username: Your valid Salesforce username
-
Password: Your Salesforce password
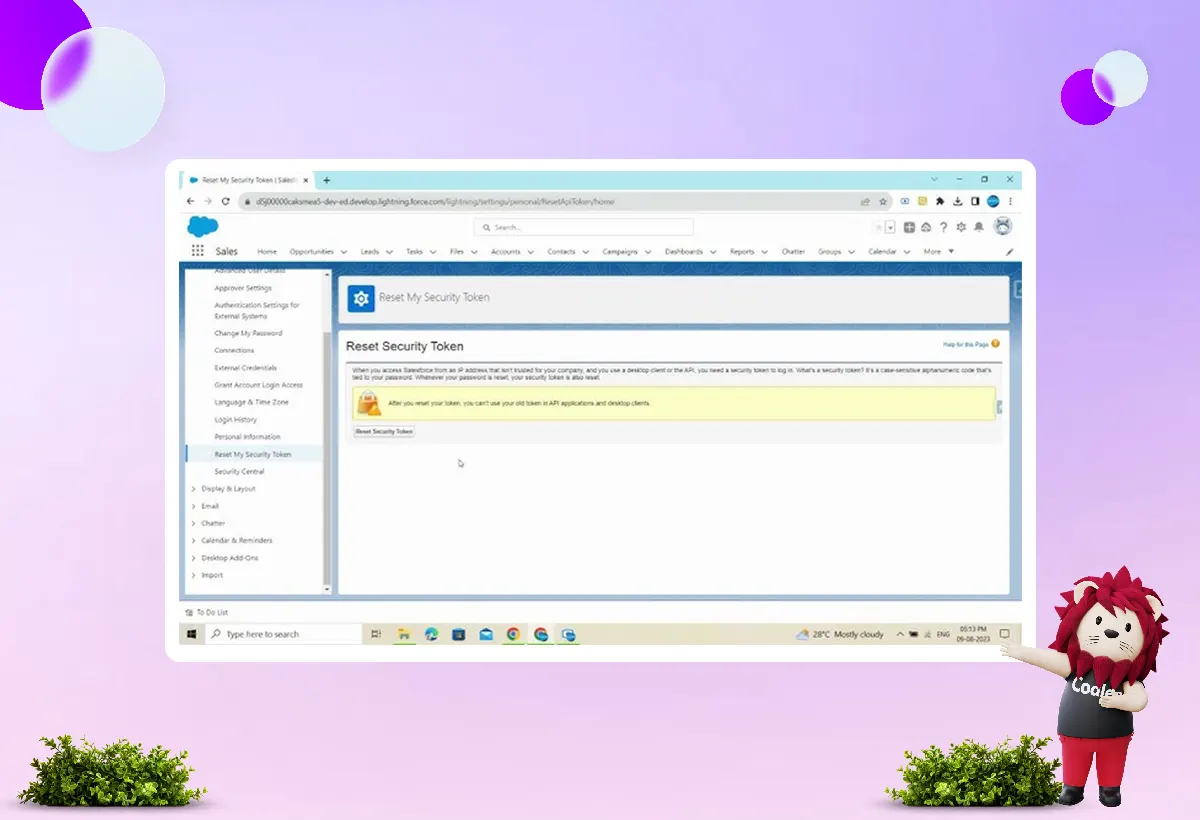
-
Security token: Open your org > click on User Profile (a doll sign icon located in the top right corner) > click on Settings> click on Reset My Security Token (located on the left side) > click Reset Security Token.
-
-
1.5. Check your connection: The connection should be successful by now.

Step 2. Select The Object You Want To Work With
-
2.1. Click on Object Type and select the object for which you want to work by pressing the dropdown.
-
(If options are not visible, click on the refresh button present near the drop-down icon and wait till it loads the object )
-

-
2.2. Click on the canvas
-
2.3. Bring the transform message component from the palette to the canvas.
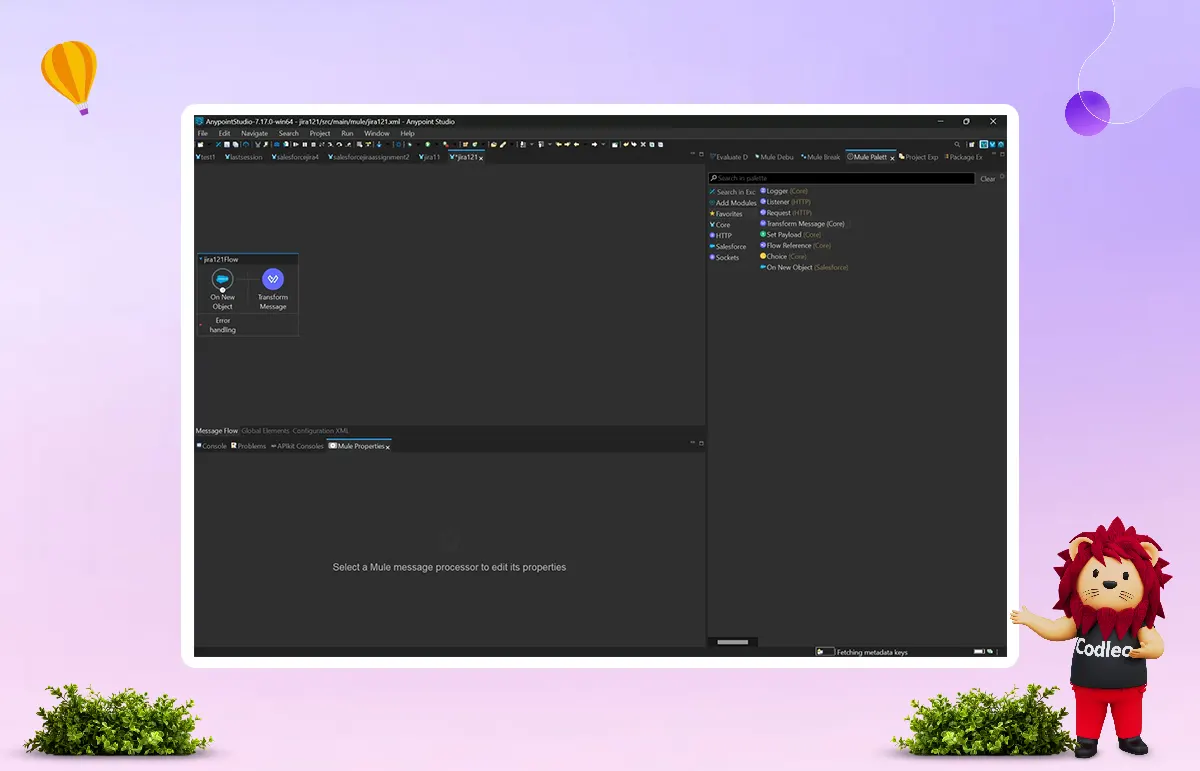
-
2.4. Now Enter the payload which is accepted by JIRA, which is shown below:
Step 3: Get Your Key
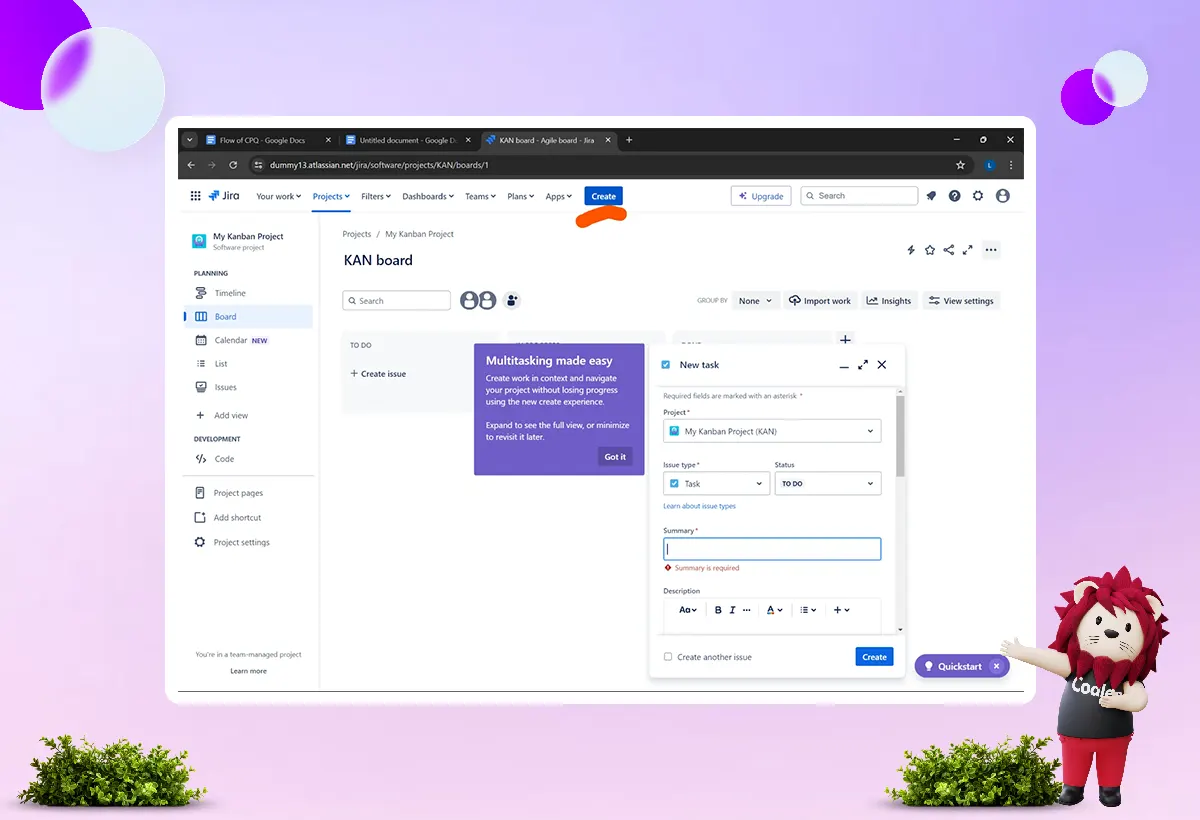
3.1. Create your account on JIRA. After creating your account, navigate to the home page and select "Create," followed by "Create a project."
3.2. After the successful creation of your project, you will need credentials to sign in to Anypoint Studio.
-
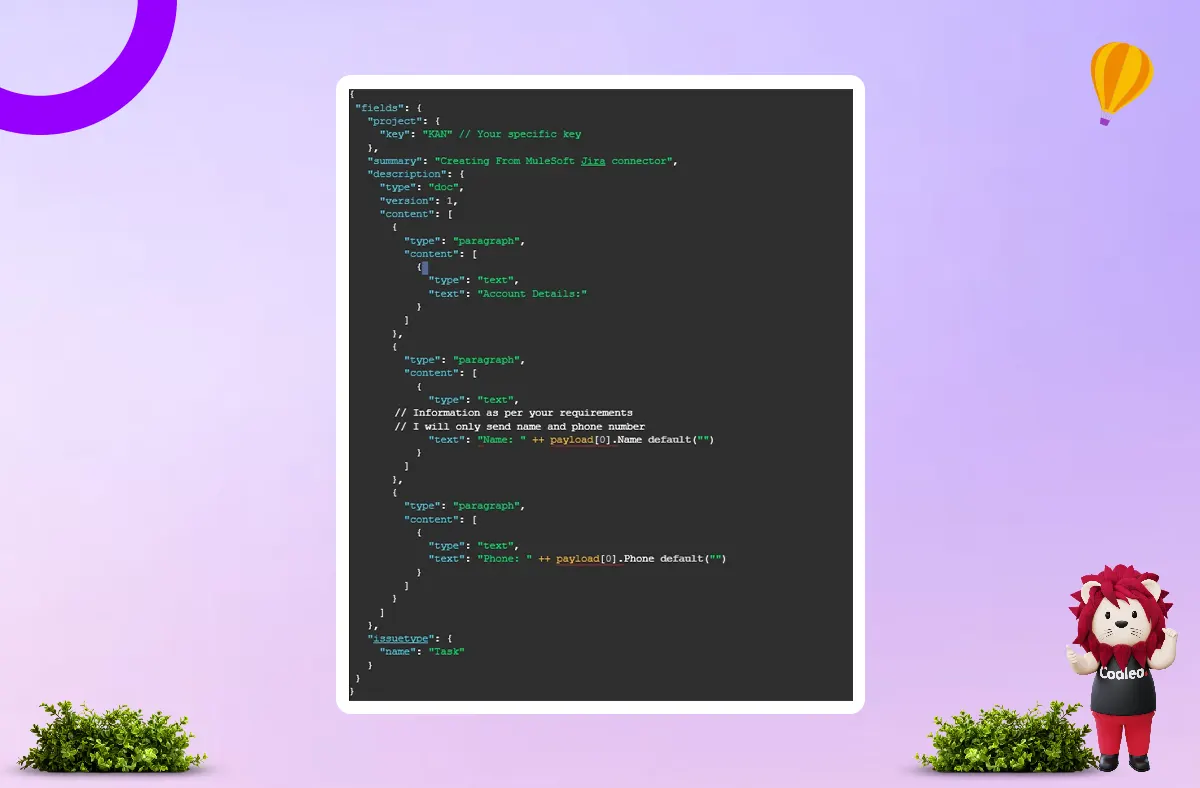
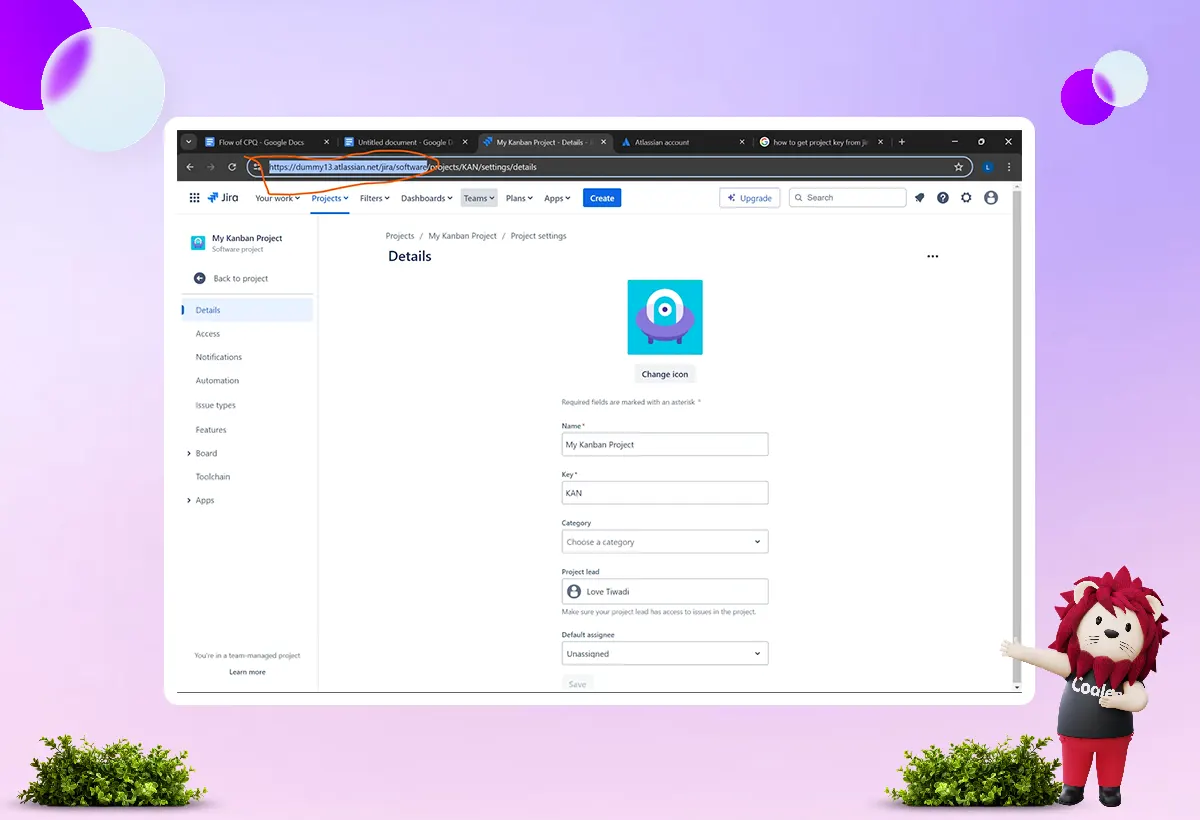
3.2.1. To look in for your key details (to apply it in your transform message payload): Click on Project > Select your project > Project Setting
-
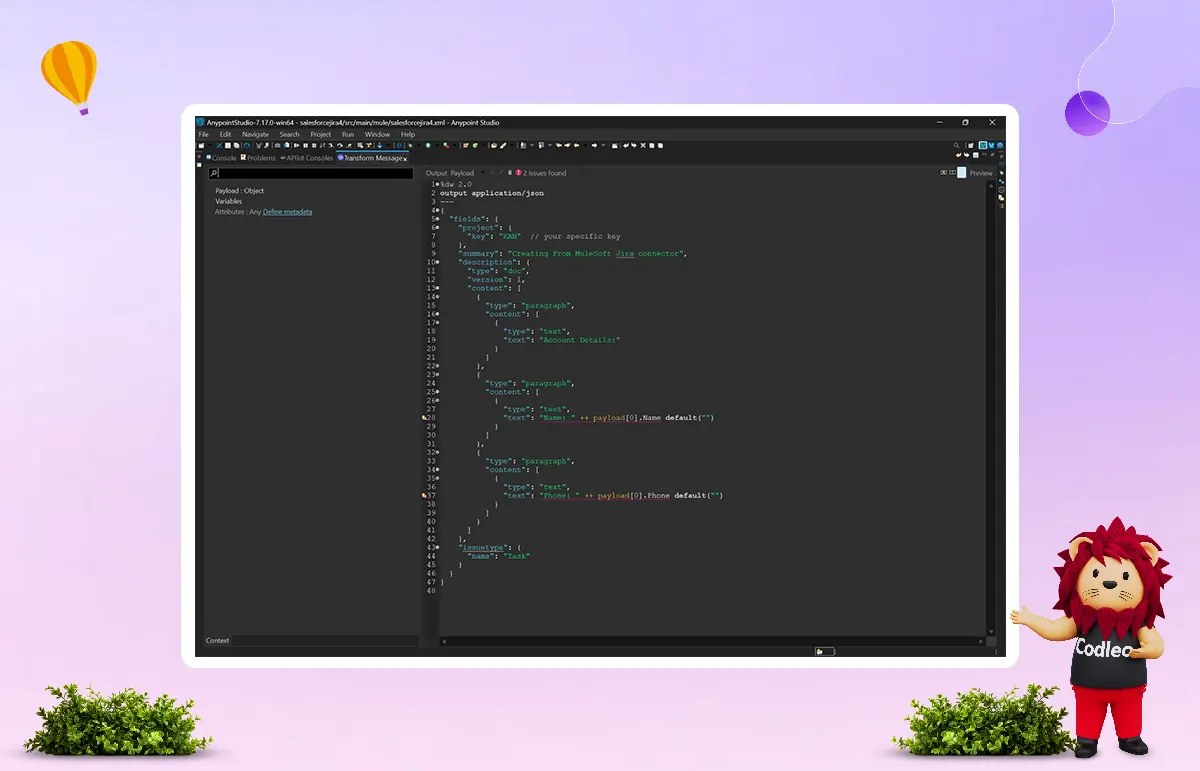
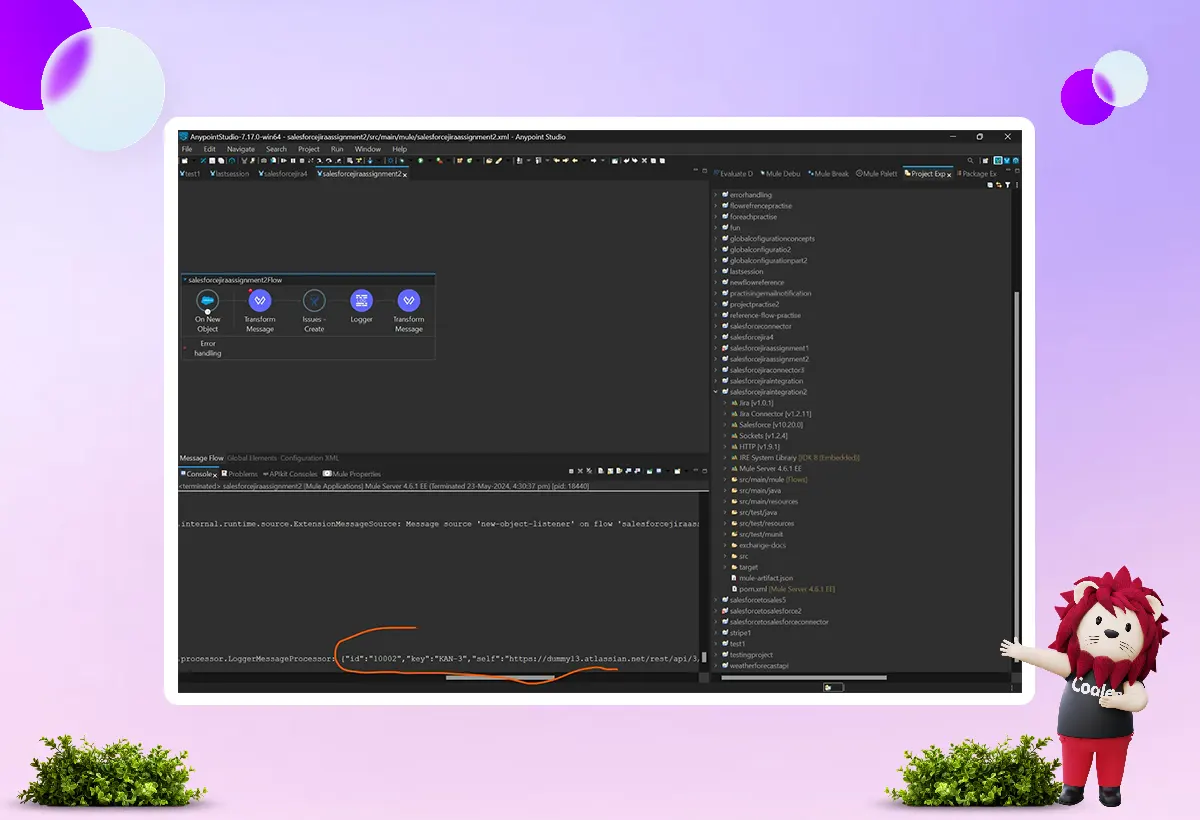
3.2.2. Copy this key and paste it into your transform message component, then create a JSON structure as needed. The image shown below is just for example:
Note: Don’t worry about the red line; it is not for factual errors (to confirm, click on configuration.xml and check that it does not have any red lines in the code.)
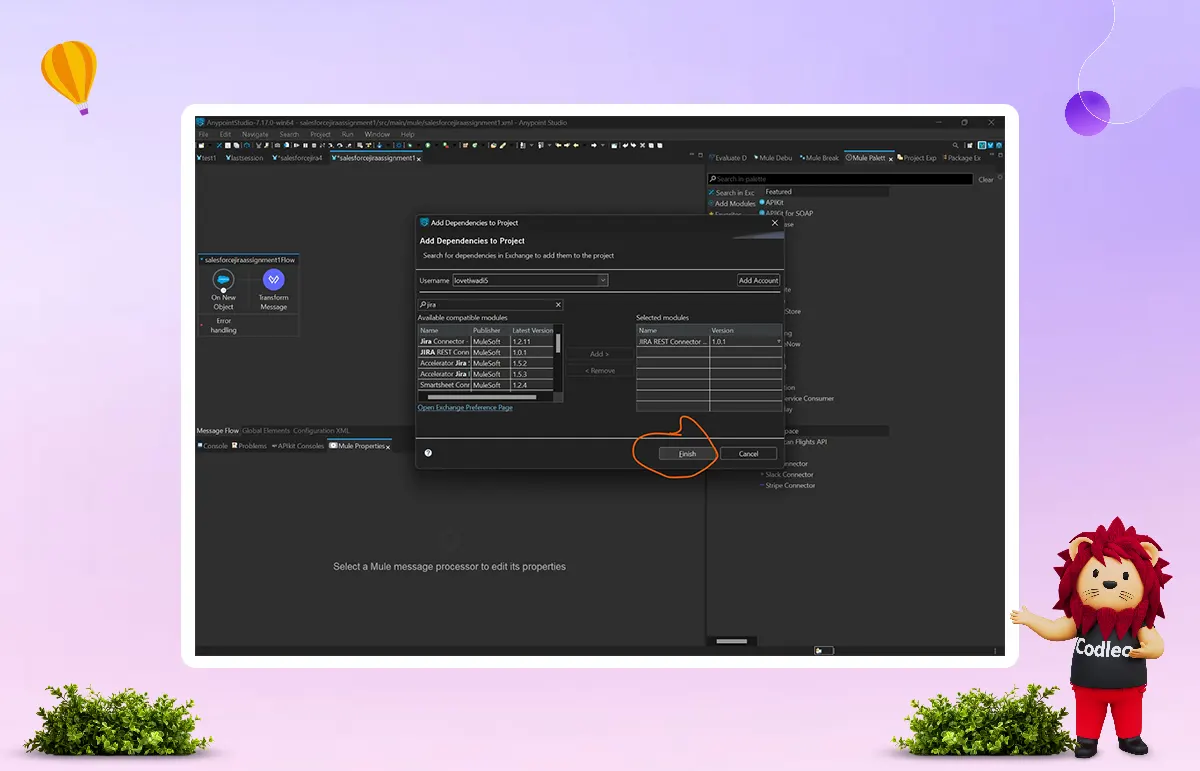
Step 4: Now Download ‘Rest JIRA Connector’ In Anypoint Studio
To do it:
Click on the Mule palette > Search in Exchange > Search for the JIRA connector (download it).
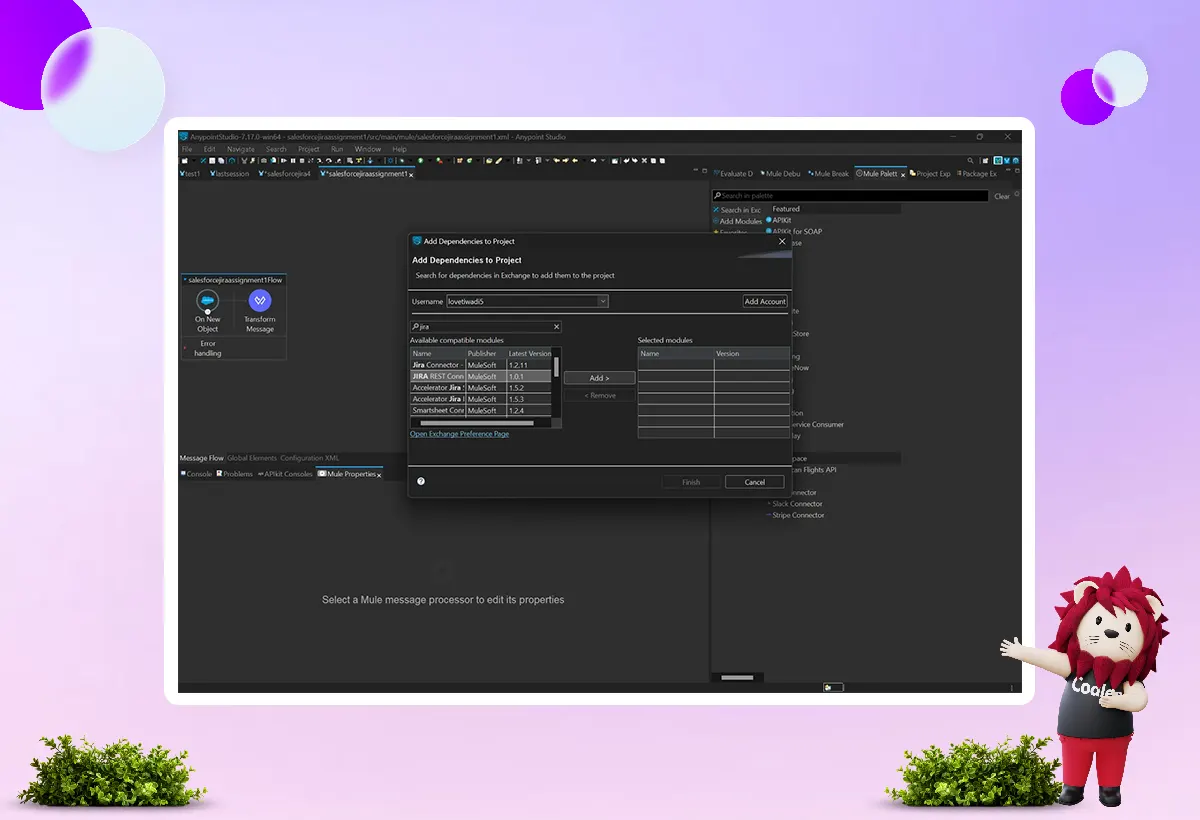
Click on finish.
Step 5. Now Open JIRA In Mule Palette
-
5.1. Select the create issue component (we are going to create an issue in JIRA from Salesforce) and drag it into the canvas.
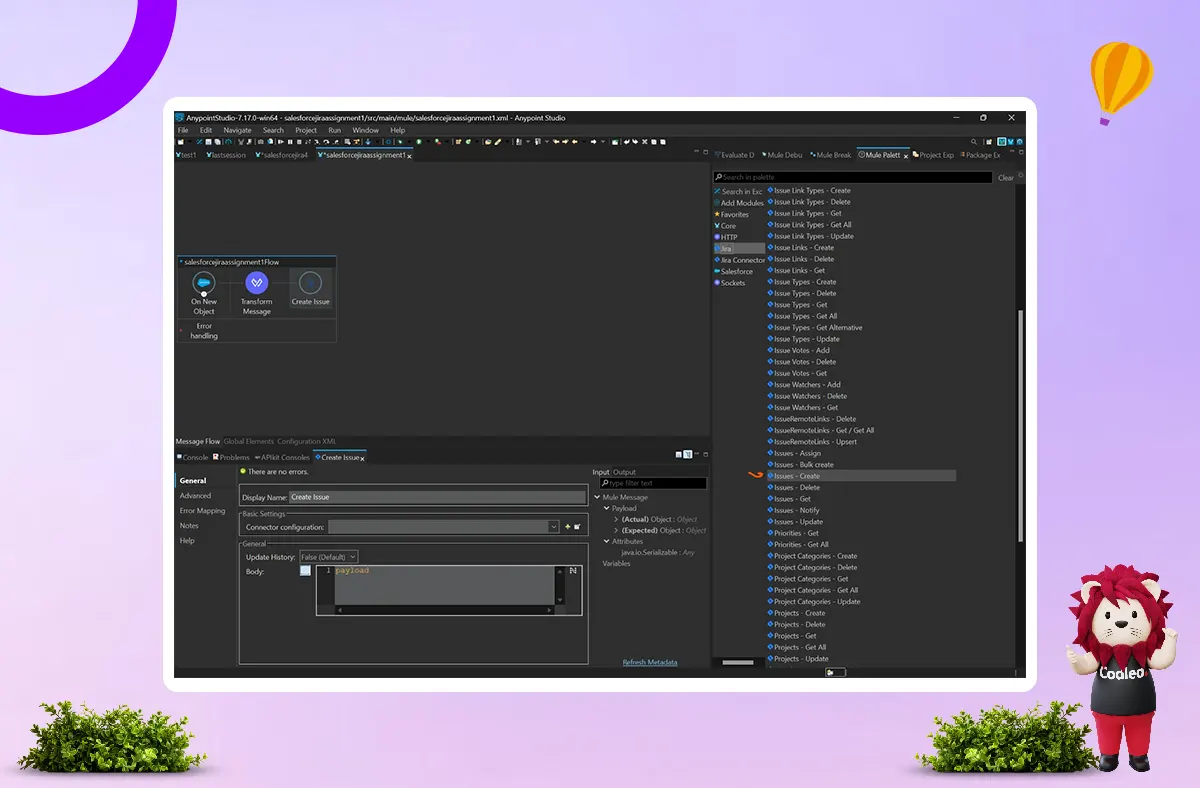
-
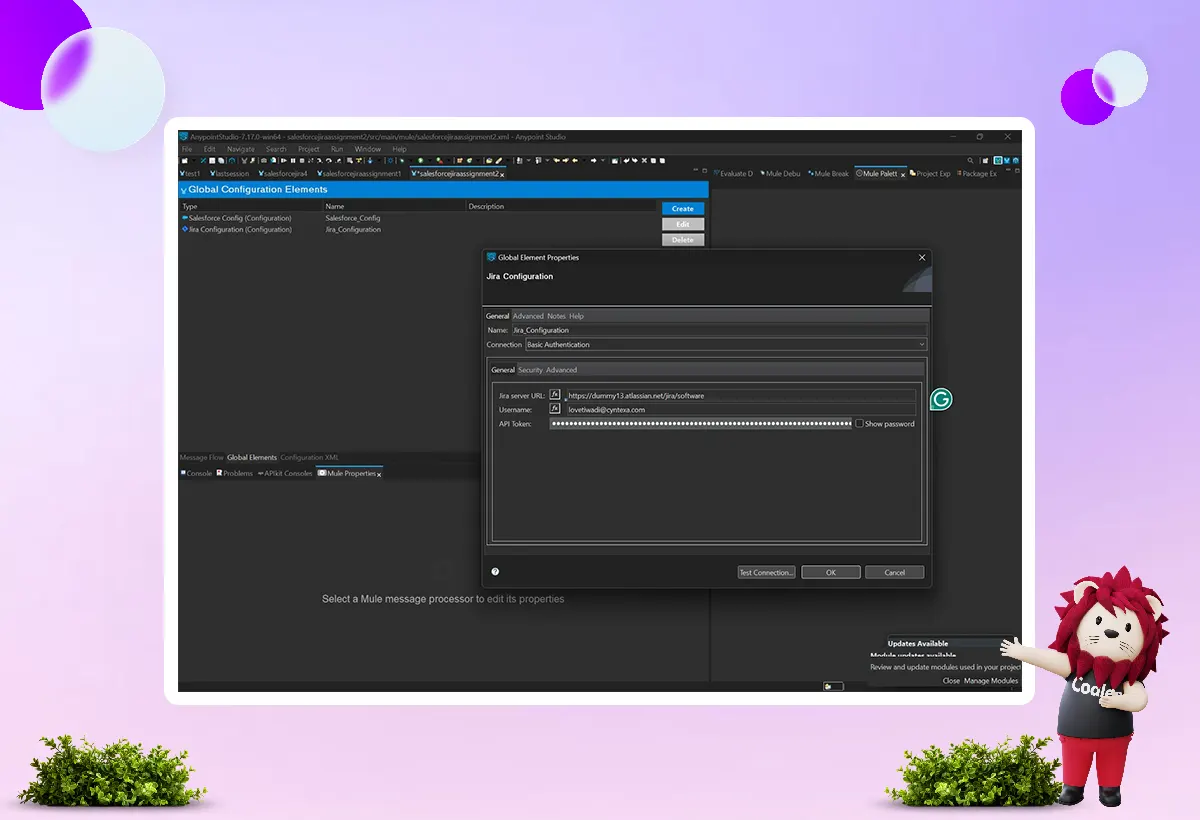
5.1.2. For configuration of JIRA connector:
- Double-click on the 'Create Issue' component and click on the plus icon (+) of the connector configuration.
5.1.3. It will ask three things
- JIRA server URL
- Username
- API Token
We will look at one thing at a time.
⇒ For JIRA server URL: Go to your JIRA website and copy the URL to the software, as shown in the screenshot below:

⇒ For Username: Enter your Email ID
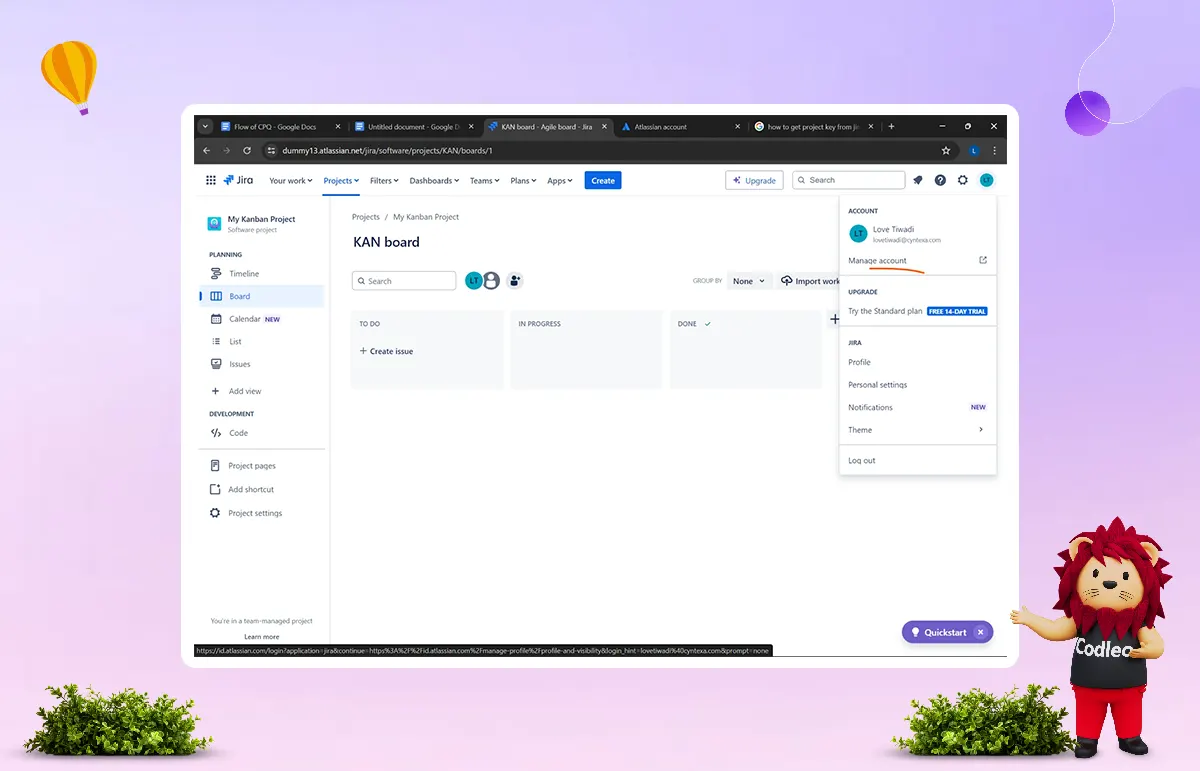
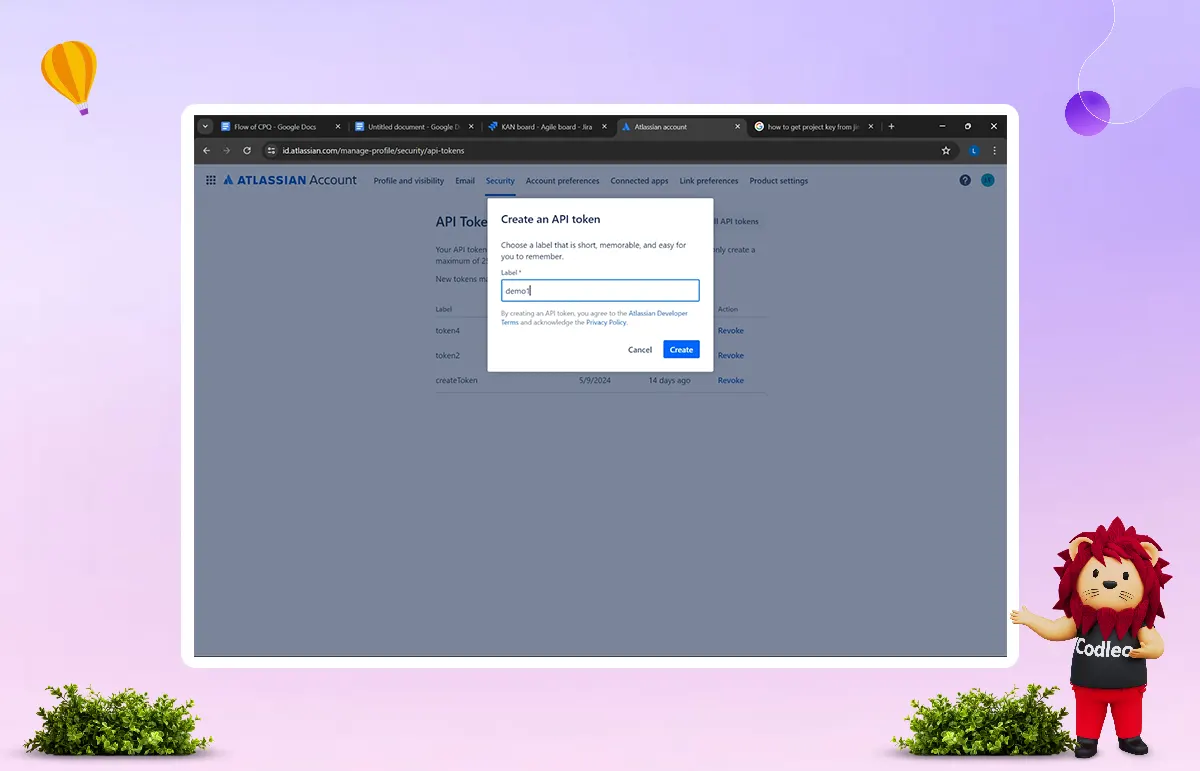
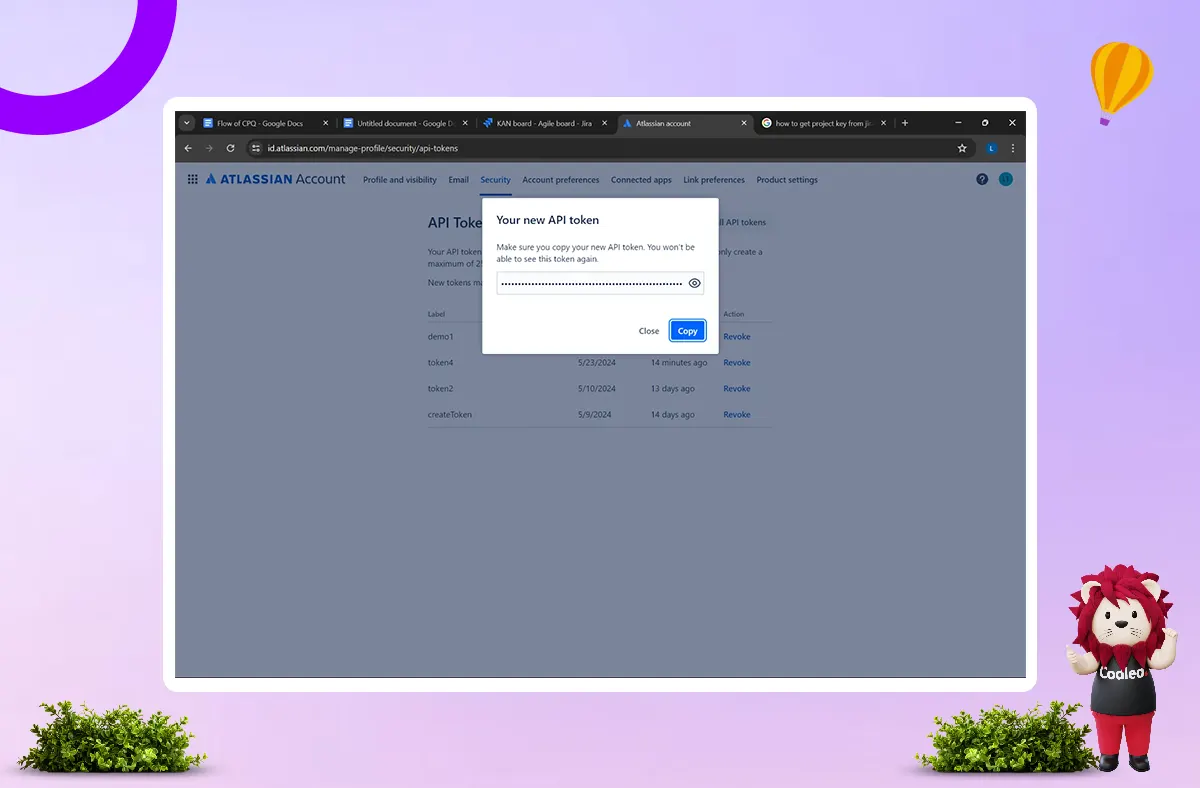
⇒ For API token:
-
Click on your profile in the top right corner
-
Click on Manage account
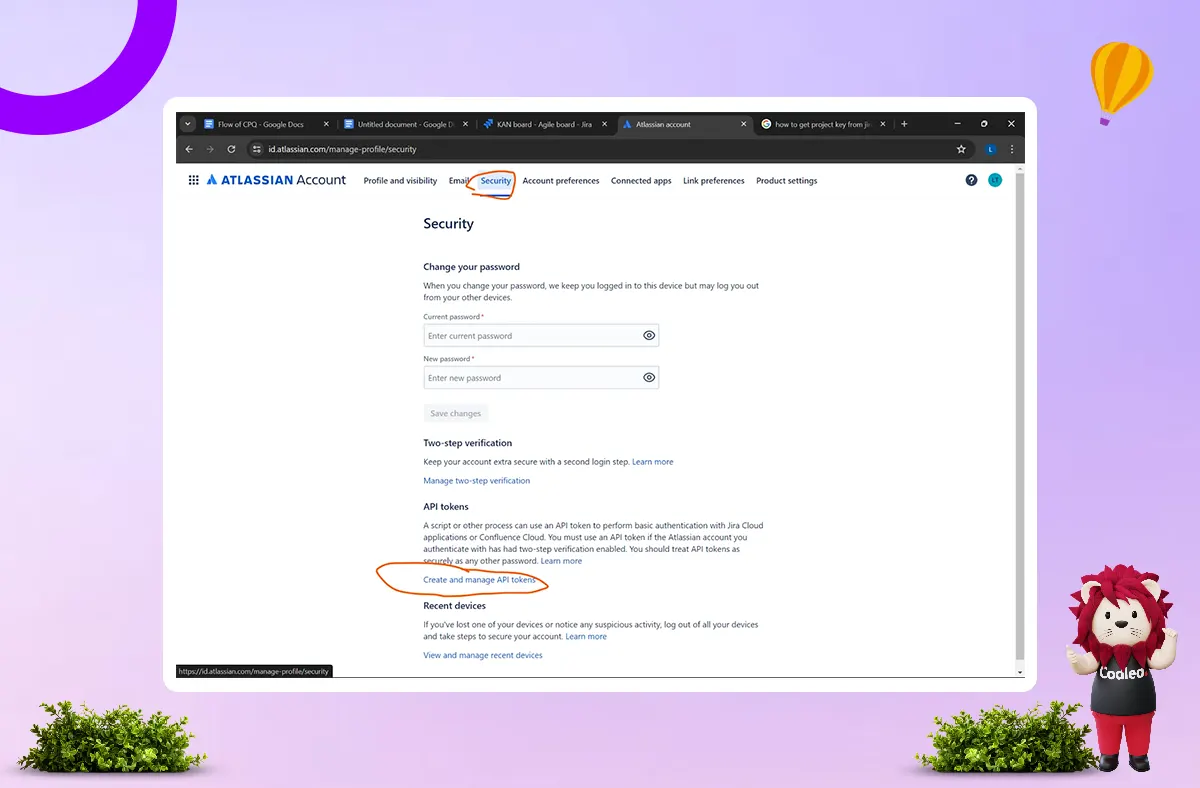
-
Click on the Security tab
-
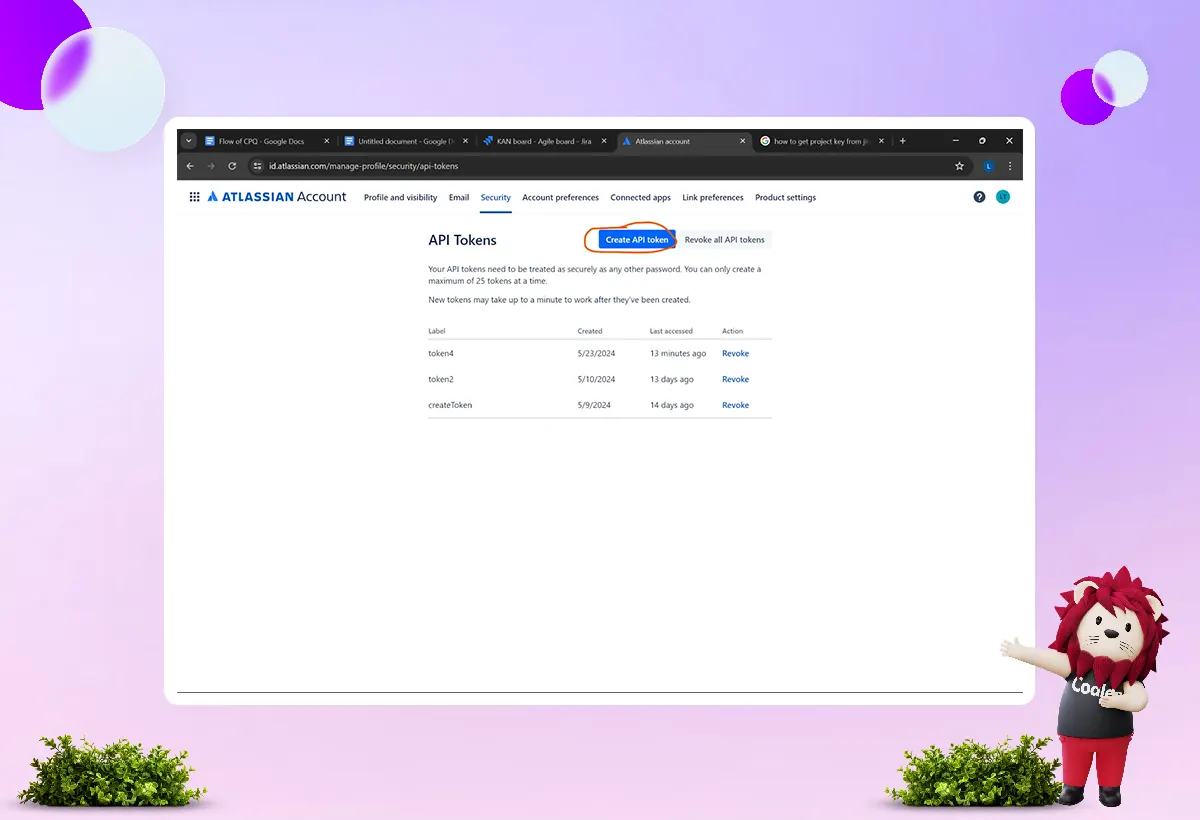
Click on Create and Manage API token
-
Click on Create API Token and copy it
Now, paste all these into the connector configuration. Here are the screenshots for the above steps:
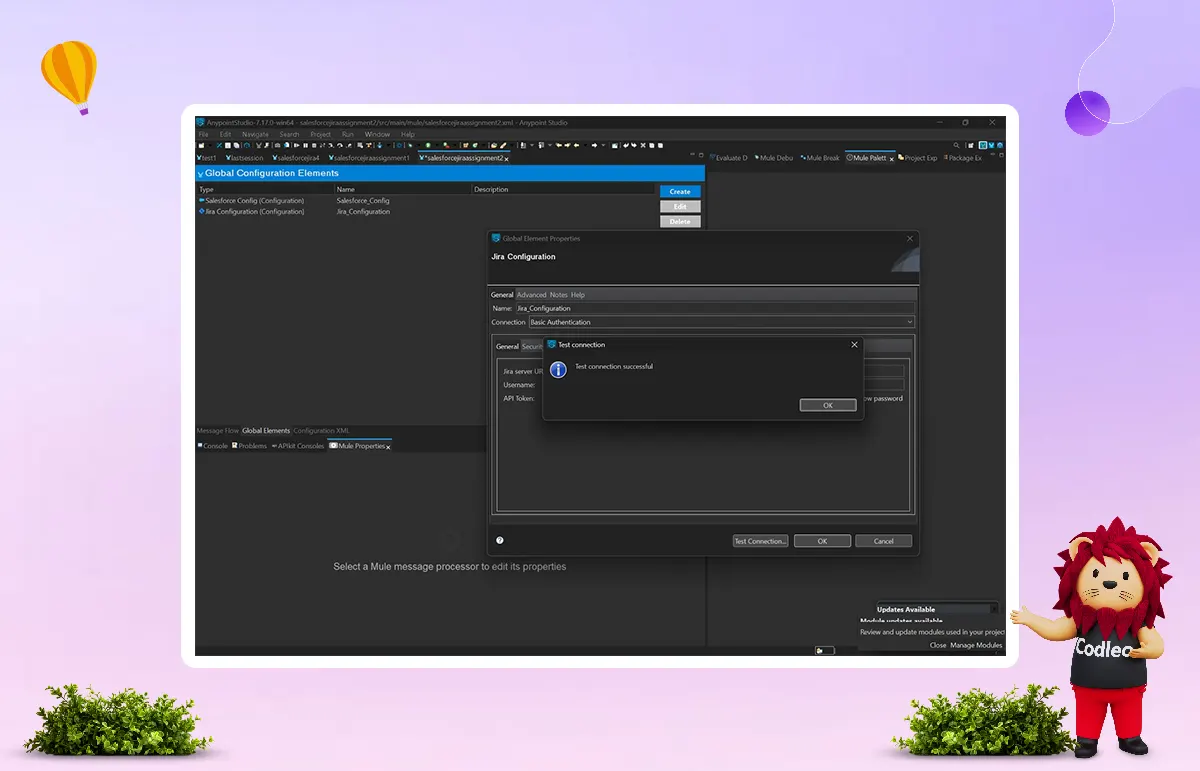
Step 6. Now Add Logger In The Flow And Run The Flow
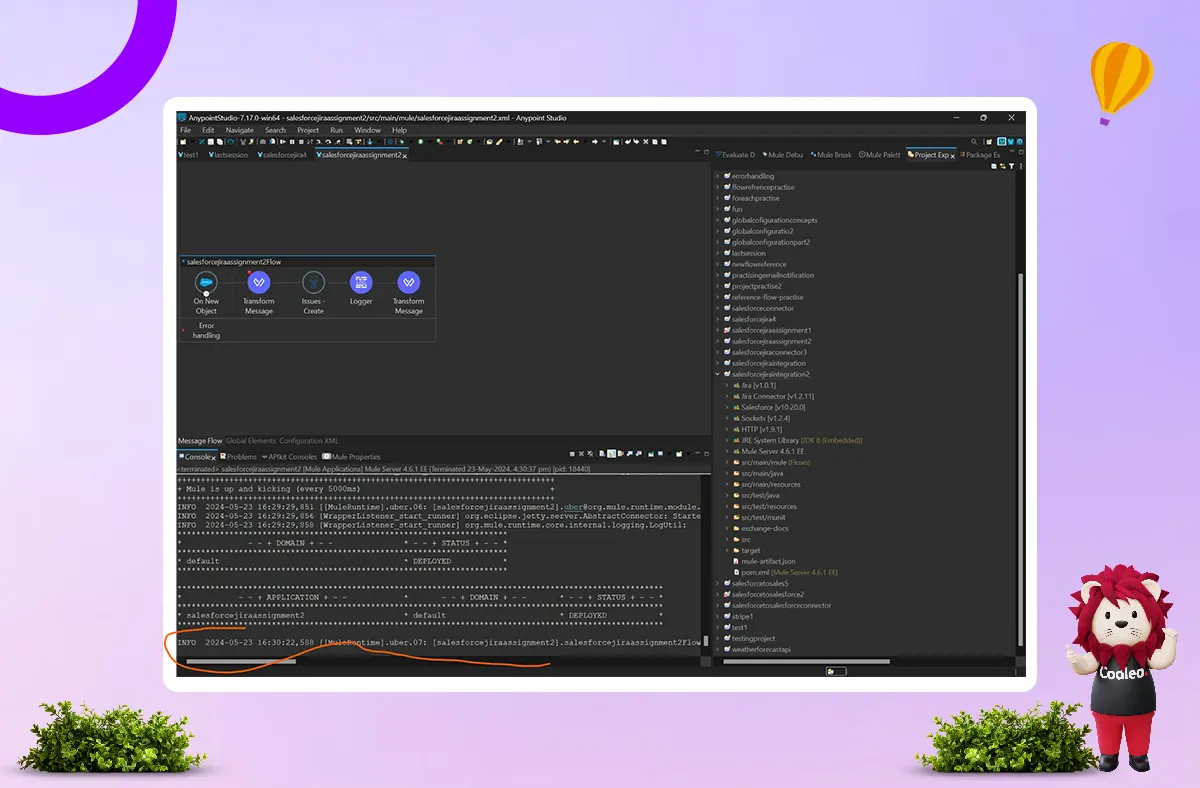
If you see the logger shown above, your issue has been successfully created. It means you have set up a smooth Salesforce JIRA integration!
Benefits Of JIRA Salesforce Integration
Streamlined Workflow Management
This integration helps your team work together more efficiently. When a customer reports an issue in Salesforce about a software feature, the support representative can create a JIRA ticket without leaving the Salesforce platform. The ticket is tracked in JIRA for the development team to address. Similarly, the development team can access customer data if needed, and once they resolve the issue, they can update the status. This update automatically appears in Salesforce.
This process reduces manual work, keeps everything in sync, and ensures your teams have the latest information.
Enhanced Visibility Into Projects
Utilizing this integration provides your business with a clearer view of all ongoing projects and customer interactions. You can view daily tasks, upcoming deadlines, and resolved issues.
This visibility helps you understand which tasks are consuming your team's time, where collaboration can be improved, and how to enhance processes. With this knowledge, you can make informed decisions for your business's growth.
Data Mapping and Security
Integrating JIRA and Salesforce ensures that data fields from both systems are accurately matched and transferred securely. This setup ensures consistent and accurate data transfer, enhancing project visibility and preserving data integrity.
Enhanced Reporting and Analytics
JIRA generates a wealth of data about project progress and the time taken for sprints. Business leaders need clear reports to analyze this data. Salesforce offers excellent reporting features through Salesforce Einstein Analytics, enabling you to view updates in easy-to-understand charts without requiring any coding.
Speeds Up Project Delivery
All these features save time. When your teams have the correct information easily accessible, they can work more efficiently. It benefits both your employees and your business. Faster project delivery helps meet deadlines and boosts customer satisfaction.
Challenges In Salesforce JIRA Integration
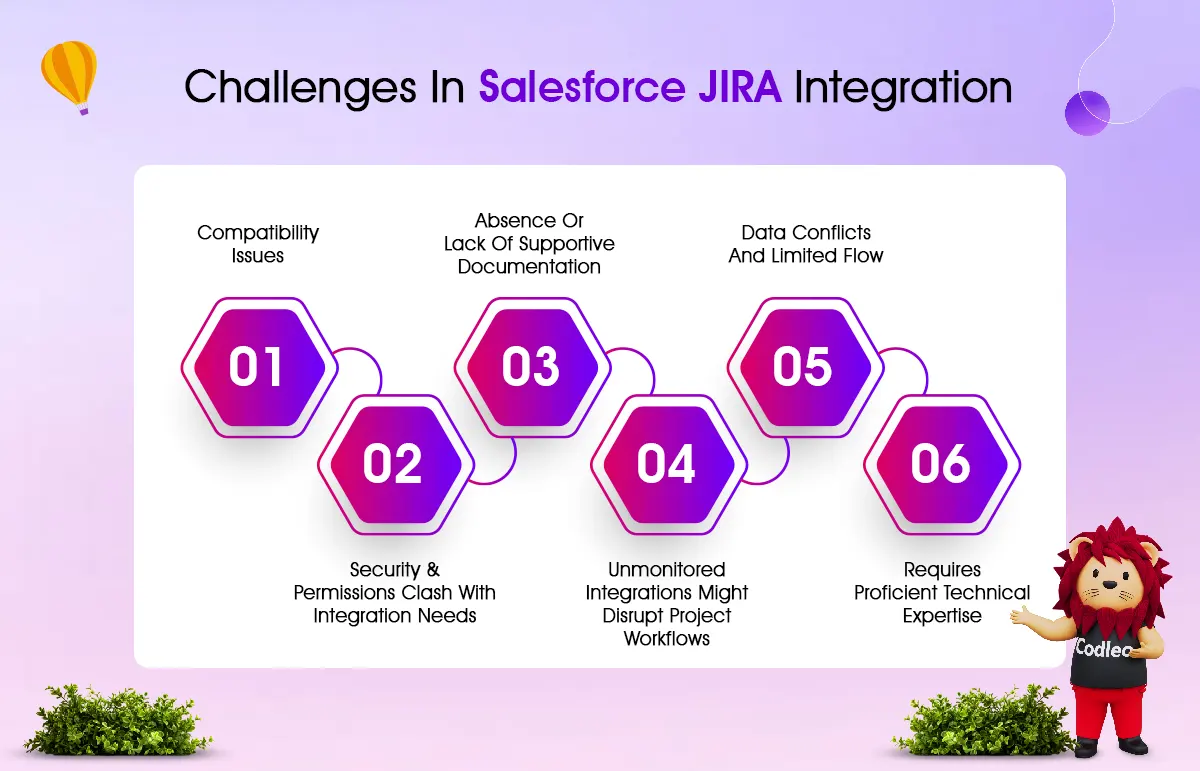
JIRA and Salesforce integration can simplify project management and improve customer satisfaction. However, it comes with a few challenges that can affect project delivery and customer experience. Here are some challenges to consider.
Compatibility Issues
JIRA does not connect directly with Salesforce, so you need a third-party connector or custom integration, which can increase costs. These connectors may not always work well together, leading to complexity and potential failures. Older connectors might not support the latest features, which can disrupt workflows and cause data issues. Choose a reliable connector that meets current standards.
Lack of Supportive Documentation
Good documentation is essential for successful integration. If the documentation is unclear or missing, it can complicate the process and lead to errors. To avoid this, consider getting help from experts who offer professional Salesforce integration services. They can address any issues that arise during integration to ensure a seamless connection.
Data Conflicts and Limited Flow
Updating JIRA and Salesforce simultaneously can lead to data synchronization issues. It can lead to errors and loss of important information. To address this, do the following:
-
Remove duplicate data.
-
Map fields between JIRA and Salesforce.
-
Use automated processes to resolve conflicts.
-
Choose a strong Salesforce JIRA integration tool.
Security and Permission Issues
Improper user access can expose sensitive information, damage your organization's reputation, and lead to legal trouble. Ensure that access is granted to those who need it. Additionally, encrypt your data while it is stored and during transfer between JIRA and Salesforce for extra security.
Unmonitored Integrations Disrupt Workflows
You need to monitor and maintain your integration to identify and resolve errors and performance issues. If you don't, these problems can go unnoticed. Set up alerts for potential system issues and perform regular checks to ensure data accuracy and consistency.
Need for Technical Expertise
Integrating these two platforms requires technical skills, such as knowledge of APIs and coding. For businesses with non-technical teams, this can be challenging. A cloud consulting company can help with this.
Conclusion
In summary, we provided key points about JIRA and Salesforce integration to help you maximize its benefits. This integration offers advantages such as improved project management, enhanced issue tracking, and stronger customer relationships. For guidance, refer to this stepwise Salesforce integration guide. Don’t worry about the technical details; our Salesforce experts are ready to help you with all your complex needs.
Are you looking to improve workflows and enhance teamwork with a better connection between Jira and Salesforce? At Codleo, we provide Salesforce integration services to help you maximize the benefits of your Salesforce system. As a top Salesforce partner, we ensure your systems work well together, making your work more efficient and effective. If you're experiencing technical issues or require guidance, our skilled Salesforce consultants are available to assist you.
Choose Codleo as your trusted Salesforce integration company for a smooth and successful integration experience. Contact us today to get started!
Also Read: Salesforce SharePoint Integration: A Step by Step Guide to Seamless Connectivity
 0
0
About the Author