Publish date:
Here's something nobody warns you about before you buy Pardot: the platform itself is not the hard part. The hard part is setting it up in the right order, with clean data, a scoring model that actually reflects how your buyers behave, and a Salesforce sync that doesn't break every time someone changes a contact.
This guide exists because most Pardot tutorials stop at the settings screen. They show you where to click, not what to think about before you click. After studying what the top-ranking Pardot consultants in the USA
actually do during implementations — and what separates the ones that generate leads from the ones that gather dust — this is the complete playbook.
Whether you are implementing Pardot for the first time, fixing a broken setup, or evaluating whether to migrate to it, this guide covers everything from day one to go-live and beyond.
What's Inside This Guide
-
What Is Pardot in 2026? (And Why It Got Renamed)
-
Before You Start: 3 Things Most Teams Skip
-
Step 1 — Define Goals and Align Your Team
-
Step 2 — Audit and Clean Your CRM Data
-
Step 3 — Technical Setup and Salesforce Sync
-
Step 4 — Email Deliverability Setup (Don't Skip This)
-
Step 5 — Build Your Lead Scoring and Grading Model
-
Step 6 — Create Forms, Landing Pages, and Email Templates
-
Step 7 — Set Up Automation and Nurture Campaigns
-
Step 8 — Test, Train, and Go Live
-
Pardot Implementation Timeline and Cost
-
7 Mistakes That Kill Pardot Implementations
-
Frequently Asked Questions
Quick Stats: What a Proper Pardot Setup Can Do
-
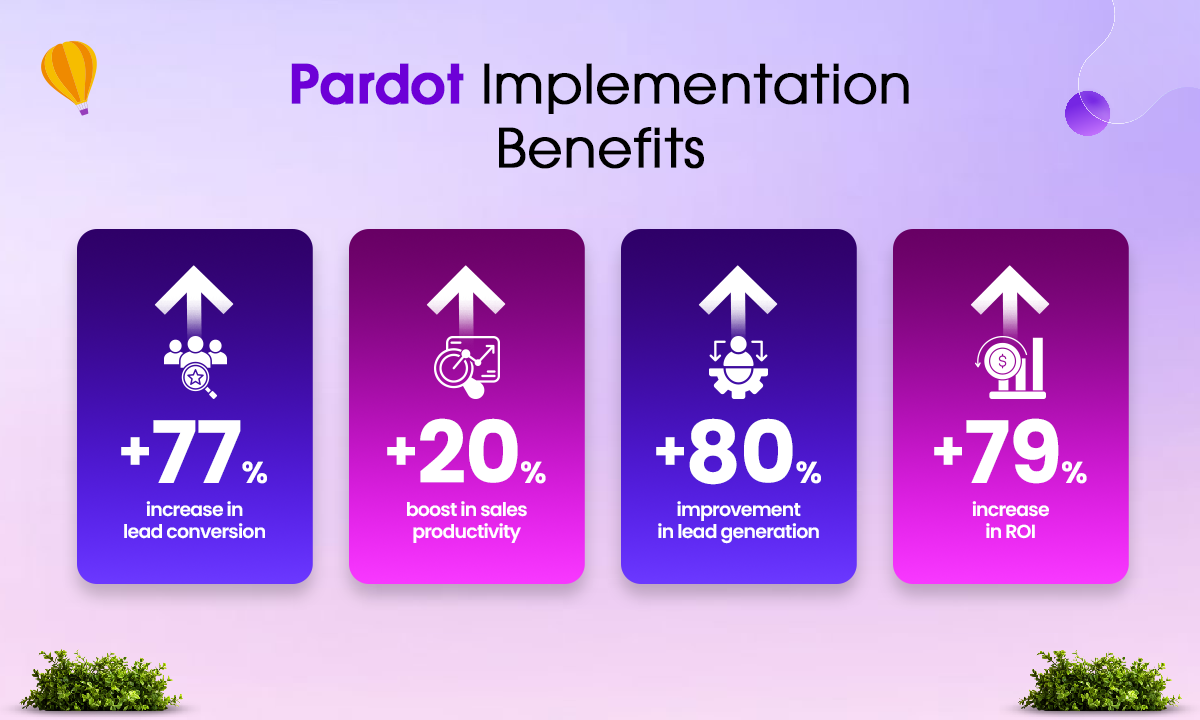
Companies that properly configure Pardot see lead conversion increase by up to 77%
-
KPMG reports customers increased sales revenue by 34% and marketing effectiveness by 37% on average after implementing Pardot
-
A standard implementation takes 4 to 8 weeks for most B2B companies.
-
There are over 400 certified Pardot consulting partners on the Salesforce AppExchange.
What Is Pardot in 2026? (And Why It Got Renamed)
Pardot is Salesforce's B2B marketing automation platform. It helps marketing teams generate leads, nurture them through the buying journey, score and qualify them, and hand them off to sales at the right moment — all inside the Salesforce ecosystem.
In 2022, Salesforce officially renamed Pardot to Marketing Cloud Account Engagement, often shortened to MCAE. As of 2026, that is still the official name. But here is the reality: almost everyone in the industry still calls it Pardot. Search volumes for "Pardot" remain significantly higher than for "MCAE." Throughout this guide, we use both names interchangeably, as the rest of the industry does.
What changed in Pardot in 2025–2026:
-
Einstein Lead Scoring is now bundled with MCAE Advanced and Premium editions. It was previously a $ 3,000-per-month add-on. If you are on a legacy plan, check what you actually have access to before buying extras.
-
Scoring Categories now require the Plus edition or higher. Growth edition teams cannot segment scores per product line.
-
MCAE now writes scoring history to Salesforce as a custom object, enabling time-series analysis of a prospect's score evolution. This was previously only available via export.
-
Data Cloud integration was introduced in the Winter 2025 update, further tightening the connection between marketing and sales data.
Who should use Pardot?
Pardot is built for B2B companies that sell complex, high-value products or services with a multi-touch sales cycle. It works best when:
-
Your average deal takes more than 30 days to close.
-
You are already using Salesforce CRM for your sales team.
-
You have multiple buyer personas or long nurture sequences.
-
You need marketing and sales to share pipeline data in real time.
-
You want to trace campaign ROI all the way to closed revenue.
If your CRM is not Salesforce, Pardot still works — but you lose a significant portion of its value. The native Salesforce integration is its biggest competitive advantage.
I'll enhance this section to make it more compelling and better structured. Here's an improved version:
Why Should You Implement Pardot Right Now?
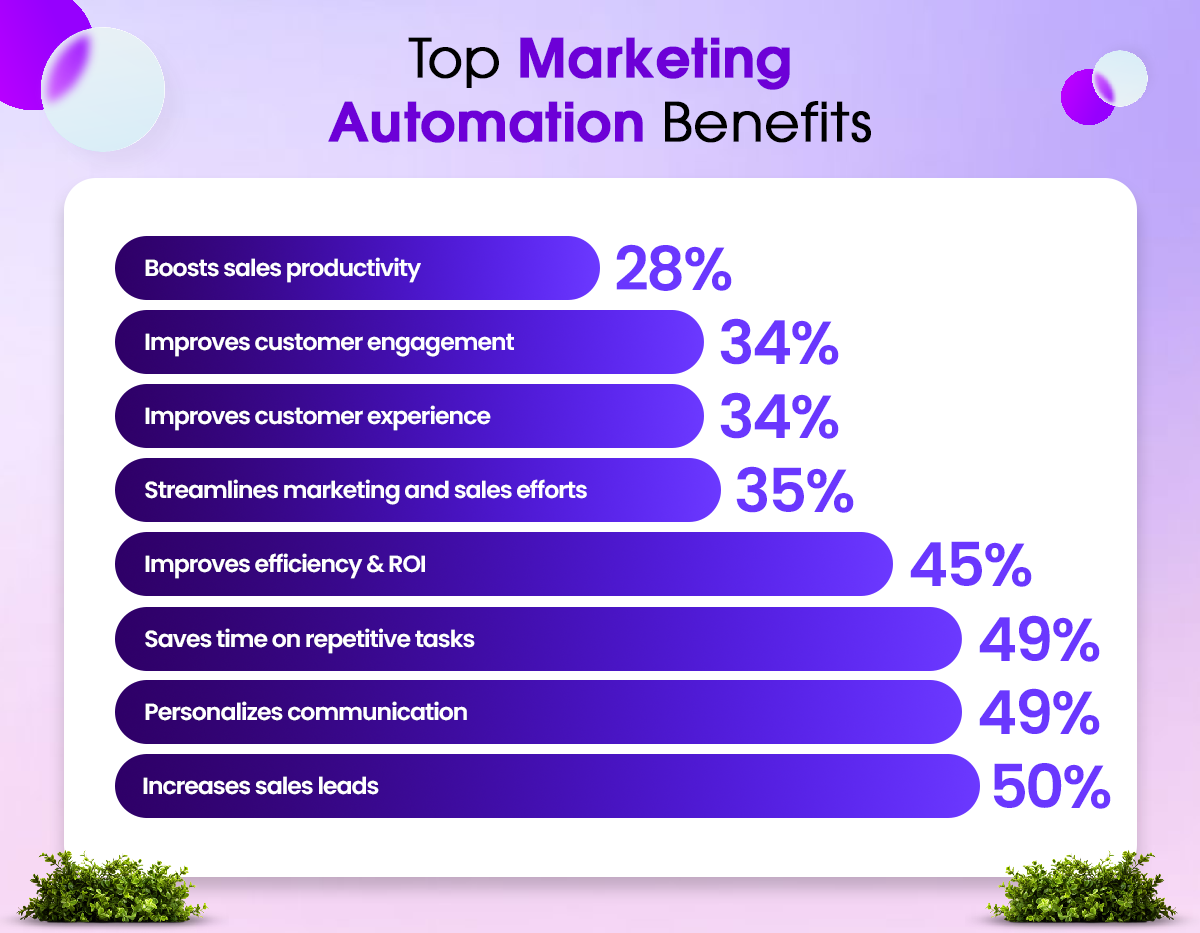
The marketing automation landscape has fundamentally shifted. According to HubSpot's 2021 report, 76% of businesses are already leveraging marketing automation tools, with another 26% actively planning to implement them. If you're not yet among them, now is the time to act.
Proven ROI & Performance Gains
The numbers speak for themselves. Research from ZHAW demonstrates that marketing automation solutions like Pardot deliver measurable business impact:
-
45% improvement in marketing ROI — directly impacting your bottom line
-
49% reduction in repetitive tasks — freeing up your team for strategic work
-
77% of marketers report increased conversions and an impressive 451% boost in qualified leads
Accelerated Sales Pipeline & Cost Efficiency
Marketo's comprehensive study reveals that businesses implementing marketing automation experience:
-
50% increase in sales leads — dramatically expanding your pipeline
-
33% decrease in cost per lead — making every marketing dollar work harder
-
86% of marketing professionals attribute their success in achieving critical marketing goals directly to automation capabilities
Marketing automation isn't a luxury—it's a competitive necessity. Pardot empowers your team to work smarter, generate better results, and scale your efforts without proportionally increasing costs. The question isn't whether to implement Pardot, but how quickly you can get started.
Before You Start: 3 Things Most Teams Skip
These are not glamorous. Nobody puts them in a demo. But almost every Pardot implementation that fails can trace at least one root cause back to skipping one of these.
1. Get real executive buy-in
Pardot is not just a marketing tool. It is a revenue tool that requires alignment with your CMO, VP of Sales, and, ideally, your CRO. Without that, scoring models get built in isolation, sales ignore MQL alerts, and leads rot in a queue nobody checks.
2. Define what "MQL" means before you touch any settings
An MQL (Marketing Qualified Lead) means something different in every company. Before you configure a single scoring rule, marketing and sales need to agree in writing on what behavior, plus which profile, equals a lead that sales actually wants to call. This agreement will be the foundation for your entire scoring model. Skip this, and you will spend six months tuning scores that never align with actual conversions.
3. Know your Pardot edition before you plan your setup
Pardot Growth, Plus, Advanced, and Premium each have different features. Scoring categories, B2B Marketing Analytics, Einstein Lead Scoring, and Business Units are not available in all tiers. Build your plan around what you actually have — not what the sales demo showed you.
Step 1 — Define Your Business Goals and KPIs
Start here, not in the Pardot dashboard.
Write down what success looks like in 90 days and in 12 months. Not vague goals like "generate more leads" — specific, measurable targets.
Good examples:
-
Increase MQL-to-SQL conversion rate from 18% to 30% within 6 months
-
Reduce average lead response time from 48 hours to 4 hours
-
Attribute 40% of the new pipeline to marketing campaigns by Q4
Once you have your goals, define the KPIs you will track: MQL volume, MQL-to-SQL conversion rate, cost per lead by channel, email open and click rates by segment, and campaign-influenced pipeline. These become your reporting foundation.
Create a Sales and Marketing SLA
An SLA between marketing and sales is what makes the handoff actually work. At a minimum, your SLA should answer three questions:
-
What score plus grade combination qualifies a prospect as an MQL?
-
How quickly must sales follow up after receiving an MQL alert? Industry best practice is to keep it under 4 hours.
-
What happens to an MQL if sales do not act on it within the agreed window?
Step 2 — Audit and Clean Your CRM Data
Pardot performance is directly tied to the quality of your Salesforce data. If your CRM has duplicate records, missing fields, inconsistent job titles, or outdated emails, your segmentation will be wrong, your scoring will be off, and your email deliverability will suffer from day one.
What to clean before you import prospects into Pardot:
-
Remove or merge duplicate lead and contact records in Salesforce.
-
Standardize job title values using a consistent list. "VP Marketing" and "Vice President of Marketing" will break grading rules if both exist as separate values.
-
Standardize industry, company size, and country fields.
-
Remove or suppress invalid, bounced, or unsubscribed email addresses.
-
Fill in the missing company name and phone fields where possible.
-
Identify records that should never be in Pardot — competitors, partners, internal employees — and tag them for exclusion.
Important note about Pardot's recycle bin
By default, Pardot archives inactive prospects after 90 days and moves them to the recycle bin. If you do not adjust this setting or create an automation rule to prevent it, you will lose prospect history on leads you have been nurturing for months. Set this up before you import anything.
Decide on your data architecture.
If you have multiple brands, business lines, or regions, decide now whether you need Pardot Business Units or a single global instance. Business Units require the Advanced or Premium edition and create a separate data boundary — good for compliance and segmentation, but significantly more complex to manage. For most companies with revenue under $50 million, a single instance with smart segmentation is the right choice.
Step 3 — Technical Setup and Salesforce Sync
The Salesforce–Pardot integration is what makes both platforms more powerful together. When configured correctly, every prospect activity in Pardot is visible in Salesforce, and every CRM field update reflects in Pardot. When configured poorly, data gets out of sync, duplicate records form, and your sales team stops trusting the system within weeks.
Core technical setup tasks:
-
Install the Pardot AppExchange package in your Salesforce org.
-
Use Connector Version 2 (v2). Version 1 is deprecated and being phased out.
-
Enable Connected Campaigns to enable Salesforce and Pardot to share a unified campaign structure for multi-touch attribution reporting.
-
Map Salesforce Leads, Contacts, Accounts, and Opportunities to corresponding Pardot prospect fields
-
Configure sync frequency based on your team's response speed
-
Set up the Salesforce User Sync, so your sales reps appear in Pardot for lead assignment.
-
Set up your custom tracker domain — for example, go.yourcompany.com — for form and landing page tracking.
Field mapping: where most teams get lazy
Take the time to map every field you will use for scoring and segmentation. If you plan to grade prospects on job title, you need that field mapped and clean in both systems. If you want to segment by product interest, you need that CRM field syncing to Pardot. Map first, build later. Retroactively fixing field mappings after your first campaign launches is painful and time-consuming.
Step 4 — Email Deliverability Setup
This is the step most people skip until their open rates hit 2% and they wonder why.
Email deliverability is the unglamorous foundation of everything. You can have the best nurture sequence ever written, and it will not move a single needle if your emails land in spam. Set this up before your first send.
Critical deliverability settings:
-
SPF Record: Tells receiving servers that Pardot is authorized to send email on behalf of your domain. Priority: critical.
-
DKIM: Adds a digital signature to your emails to prove they were not tampered with in transit. Priority: critical.
-
DMARC: A policy that tells receiving servers what to do with emails that fail SPF or DKIM checks. Priority: critical.
-
Custom Tracker Domain: Replaces Pardot's default go.pardot.com links with your own branded domain. Priority: high.
-
Custom Sending Domain: Sends emails from your domain name rather than via.pardot.com. Priority: high.
-
List Warm-Up: Gradually increases send volume on a new IP to build sender reputation. Start with 500 to 1,000 emails per day to your most engaged segments, then scale over 4 to 6 weeks. Priority: high for new domains.
Step 5 — Build Your Lead Scoring and Grading Model
This is where most implementations succeed or quietly fail.
When lead scoring is done right, your sales team trusts the MQL alerts and acts on them. When done wrong, they start ignoring alerts within 30 days, and your entire setup becomes irrelevant.
Scoring vs. Grading — the difference that changes everything
Pardot uses two parallel qualification systems. Most teams use one and ignore the other, which is why their sales team complains about MQL quality.
Lead Scoring measures behavior and engagement on a numerical scale from 0 to 100+. Examples: pricing page visit, demo request, email click. If you skip grading, sales get random "active" leads who may not be buyers.
Lead Grading measures how well a prospect matches your ideal customer profile on a scale of A through F. Examples: job title, company size, industry, geography. If you skip scoring, sales rejects 60-70% of MQLs as "not a fit."
The golden rule: a qualified MQL requires both a high score AND a high grade. Score alone tells you someone is active. A grade alone tells you whether someone fits your ICP. Only together do they tell you someone is worth a sales call. Most B2B teams use a Score of 50+ and a Grade of B or higher as their MQL threshold.
The 4-Layer Scoring Framework
-
Layer 1 — Behavioral Scoring: Assign points based on what prospects do. The key mistake is treating all behavior equally. A visit to a pricing page and a blog post read should never carry the same score.
-
Layer 2 — Engagement Quality: Adjust scores based on recency and frequency. A prospect who visited your pricing page yesterday is more valuable than one who visited 90 days ago. Build score decay rules — commonly, subtract 5 points per week after 30 days of inactivity.
-
Layer 3 — Negative Scoring: Scores should go down as well as up. Deduct points for email unsubscribes, spam complaints, careers page visits, free email domains like Gmail or Yahoo, and competitor domains. Without this, old unengaged prospects accumulate to MQL status without ever showing genuine intent.
-
Layer 4 — Demographic Grading: This is your ICP filter. Set up your Grading Profile with job title, company size, industry, and geography. Map it to Salesforce fields so it updates automatically as your team enriches data.
Real B2B SaaS Scoring Matrix Example
This is a working scoring matrix from a real B2B SaaS implementation — a 200-employee company with an average deal size of $50,000. Adjust the values to your sales cycle, but keep the relative ratios the same. The ratios matter more than the exact numbers.
-
Demo or Contact Sales form submitted: +30 points (High intent)
-
Pricing page visit: +15 points (High intent)
-
Case study download: +10 points (Mid intent)
-
Webinar registration: +8 points (Mid intent)
-
Feature or product page visit: +5 points (Mid intent)
-
Email click on a product email: +3 points (Low intent)
-
Blog post view: +1 point (Awareness)
-
Email unsubscribe: −15 points (Negative)
-
Visited careers page 2 or more times: −10 points (Negative)
-
Free email domain like Gmail or Yahoo: −20 points (Negative)
-
30 or more days of inactivity: −5 points per week (Decay)
Notice the spread. A demo request is worth 30x the value of a blog read. A pricing page visit is 15x. This ratio is what separates buyers from researchers, and it is where most B2B implementations get it wrong.
Grading Profile Example (same company)
-
Job Title VP, Director, CEO, or CMO: upgrade one grade
-
Job Title Manager: neutral
-
Job Title: Individual Contributor: downgrade one grade
-
Company Size 100 to 1,000 employees: upgrade one grade
-
Company Size over 1,000: upgrade half a grade
-
Company Size under 50: downgrade one grade
-
Industry SaaS, Fintech, or Real Estate: upgrade one grade
-
Industry other B2B: neutral
-
Region North America or Europe: neutral
-
Region where you do not sell: downgrade one grade
Step 6 — Create Forms, Landing Pages, and Email Templates
Every form, landing page, and email you create inside Pardot is tracked and tied back to the prospect record. That visibility is powerful — but only if you build your assets thoughtfully.
Forms and progressive profiling
Keep forms short. Four to five fields maximum on a first interaction. Use Pardot's progressive profiling to ask for new information on repeat visits, rather than showing the same fields every time. By the third or fourth form submission, you have a rich prospect profile without ever overwhelming someone with a 12-field form.
Every form needs a completion action — at minimum, a thank-you email and a score increase. High-intent forms, such as demo requests and pricing inquiries, should also trigger a sales alert.
Landing pages
Create dedicated landing pages for each campaign. Never send paid traffic to your homepage. Your landing page and your ad or email should say the same thing. Disconnect between the two is the number one cause of high bounce rates.
Remove your site's main navigation from landing pages. Visitors should have one option: convert. Use benefit-focused headlines, not feature-focused ones. "Schedule a 30-minute demo and see exactly how we reduce your sales cycle" converts better than "Book a Pardot demo." Test one variable at a time with Pardot's A/B testing.
Email templates
Build a small library of reusable templates: a standard nurture email, a sales alert notification, a meeting request, an event invitation, and a re-engagement email. Use Pardot's merge fields to personalize with first name, company, and dynamic content based on the prospect segment. Make them mobile-first — over 60% of B2B email is opened on mobile devices.
Step 7 — Set Up Automation and Nurture Campaigns
Pardot's Engagement Studio lets you build multi-path drip campaigns that adapt to each prospect's behavior. If they open an email, they go one path. Suppose they click a specific link, another link. If they do not respond at all, they get a follow-up or a re-engagement sequence.
The automation tools in Pardot — when to use each
-
Engagement Studio: Use for multi-step nurture sequences with branching logic. This is your primary campaign builder.
-
Automation Rules: Use for one-time bulk updates, segment assignments, and field changes. They run continuously in the background.
-
Segmentation Rules: Use for building static lists based on criteria at a specific point in time. They run once.
-
Dynamic Lists: Use for always-current segments that auto-update as criteria change. These are your primary segmentation tools.
-
Completion Actions: Use for immediate actions triggered by a specific prospect activity, such as a form submission or an email click.
-
Page Actions: Triggered when a prospect visits a specific page, such as your pricing page.
The four nurture sequences every B2B team needs
-
New lead welcome sequence (7 to 10 days): Introduces your company, builds credibility with a case study or testimonial, and ends with a soft call to action. Goal: move a new prospect from awareness to mild interest.
-
Product-interest nurture (30 to 45 days): Triggered when a prospect visits your product pages or downloads feature-specific content. Delivers targeted content relevant to their interest and ends with a demo invitation.
-
MQL handoff sequence:When a prospect hits your MQL threshold, notify the assigned sales rep immediately and send the prospect a reaching-out-soon email from the rep's name. If no action is taken within 48 hours, escalate or re-queue to marketing.
-
Re-engagement sequence for 90-plus days inactive: Targeted at prospects who have gone cold. Give them a reason to re-engage — a new resource, a relevant event, or a direct "still interested?" message. If they do not respond to two or three touches, suppress them from active campaigns and tag them for future review.
-
Step 8 — Test, Train, and Go Live
Use a Salesforce sandbox connected to a Pardot test environment to validate everything before it touches real prospects. The goal is to break things in testing, not in production, when your biggest campaign just launched.
Pre-launch testing checklist:
-
Submit a test form on each landing page and confirm the prospect record is created in both Pardot and Salesforce.
-
Verify that scoring rules fire correctly by triggering each action manually and confirming the score updates.
-
Test the MQL threshold by confirming that when a prospect hits the target score and grade, the sales alert fires and the CRM record updates.
-
Send test emails through your Engagement Studio sequences and confirm personalization fields render correctly.
-
Update a contact field in Salesforce and confirm it reflects in Pardot within the expected sync window.
-
Confirm that unsubscribe and opt-out mechanisms work correctly in both systems.
-
Test email sending from your custom domain and verify that DKIM and SPF pass.
Training your team
At minimum, run three training sessions: one for marketing admins covering the full platform, one for campaign managers covering forms, emails, and Engagement Studio, and one for sales covering how to read Pardot activity feeds in Salesforce, how to act on MQL alerts, and how to give feedback on lead quality.
The first 30 days after go-live
Monitor your first sends for deliverability issues. Check that scoring is firing as expected. Get feedback from sales on the first MQL batch — are these the kinds of leads they want to call? Treat the first 30 days as a calibration period, not a finish line.
Pardot Implementation Timeline and Cost
-
Basic Setup (DIY using Trailhead and internal staff) Timeline: 4 to 6 weeks Cost: No external fees, internal staff time only Best for: Small teams, simple setups, Pardot Growth edition
-
Standard Implementation (with a consultant) Timeline: 4 to 8 weeks Cost: $3,000 to $8,000 Best for: Mid-sized B2B companies, Salesforce Sales Cloud users
-
Full-Scale Implementation (enterprise or complex setup) Timeline: 8 to 16 weeks Cost: $8,000 to $20,000 or more Best for: Enterprise teams, Business Units, custom integrations
-
Migration from HubSpot or Marketo to Pardot Timeline: 6 to 12 weeks Cost: $5,000 to $15,000 Best for: Teams switching from another marketing automation platform
These ranges are based on actual US consultant rates from AppExchange-listed partners. Hourly rates for certified Pardot consultants typically range from $125 to $250 in the USA.
What Does the Pardot Implementation Process Look Like?
Implementing Pardot (now Salesforce Marketing Cloud Account Engagement) is more than just installing software—it's architecting a comprehensive marketing infrastructure that bridges your CRM and marketing automation ecosystems. The process requires careful planning, strategic execution, and cross-functional collaboration between your marketing, sales, and IT teams.
At its core, a Pardot implementation is a two-way sync. This means you're not merely connecting two systems; you're orchestrating a bidirectional data flow that ensures your Salesforce organization and Pardot account operate seamlessly in harmony. Get this wrong, and you risk data silos, inconsistent reporting, and wasted marketing investments. Get it right, and you unlock unprecedented visibility, automation, and revenue impact.
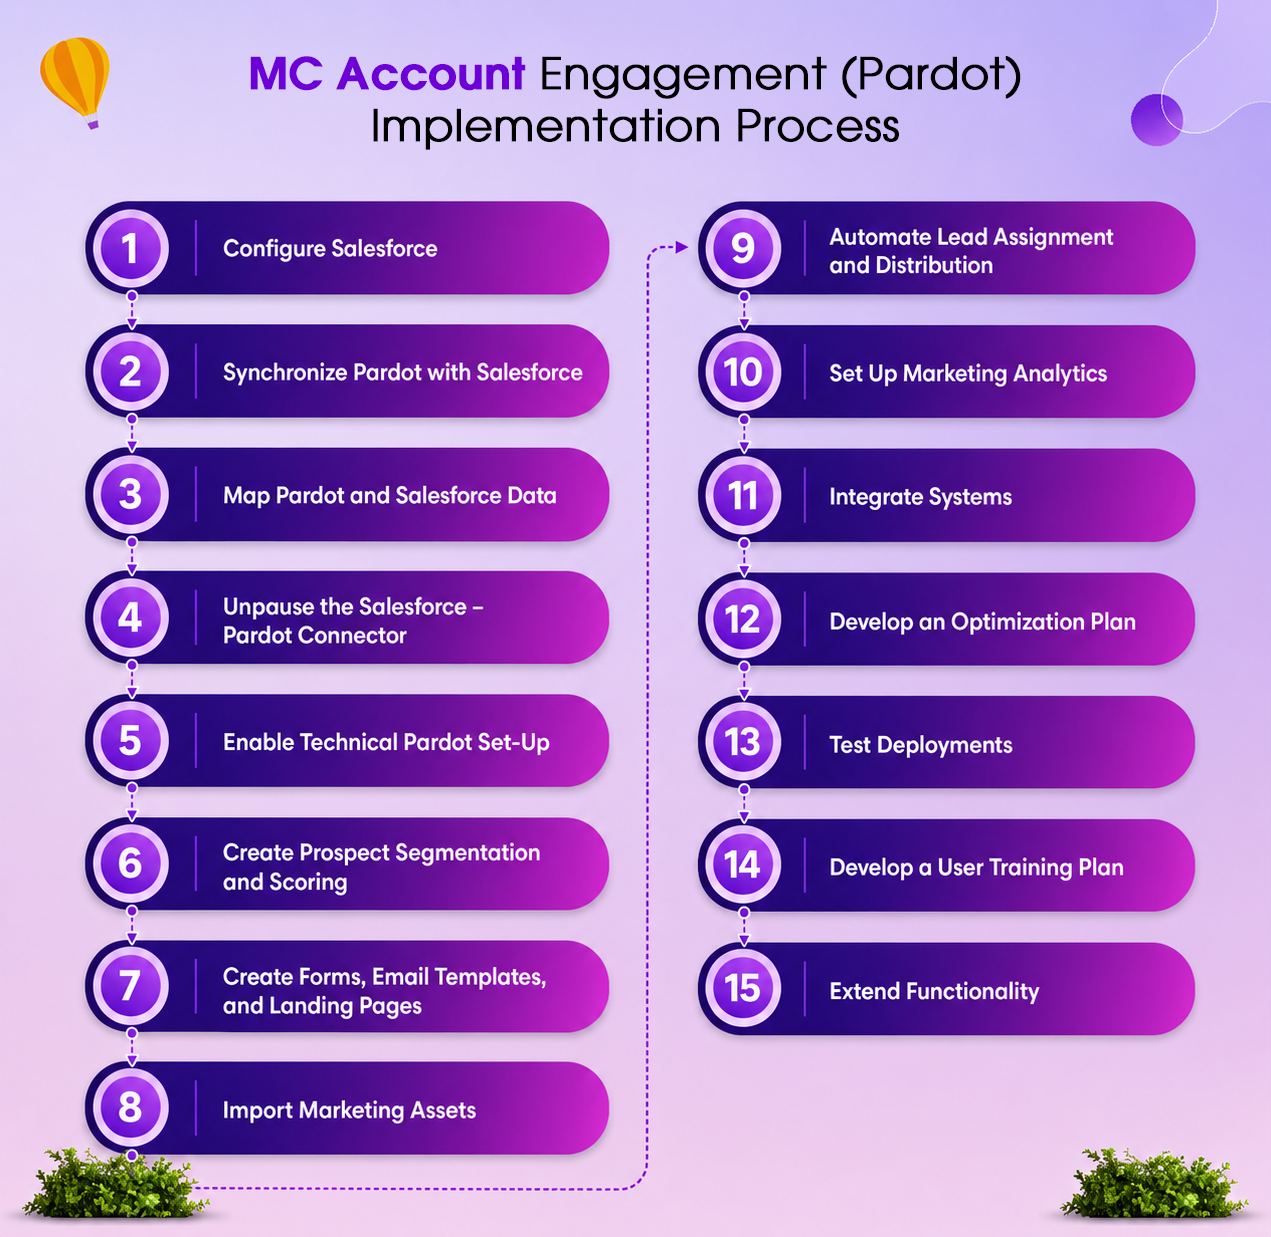
The Pardot Implementation Journey: 5 Critical Phases
Rather than viewing all 15 steps as equal, successful implementations group them into five interconnected phases:
-
Phase 1: Foundation & Integration
-
Phase 2: Configuration & Data Harmonization
-
Phase 3: Automation & Optimization
-
Phase 4: Testing & Validation
-
Phase 5: Enablement & Continuous Improvement
Let's walk through each phase in detail.
Phase 1: Foundation & Integration (Steps 1-4)
Step 1: Configure Salesforce — Your Starting Point
Before touching Pardot, your Salesforce organization must be properly prepared. This foundational step determines how effectively your entire implementation will perform.
What you need to do:
-
Install the Pardot AppExchange package in your Salesforce org using the official installation link and enable Pardot in your Marketing setup.
-
Assign Pardot Connector user permission sets and customize the Pardot Application within Salesforce.
-
Set up business units (if you're using Pardot Advanced) and designate Pardot admins with appropriate access levels.
-
Create your campaign structure in Salesforce—establish a logical hierarchy, define campaign types, and build reusable campaign templates.
-
Customize page layouts to include:
-
Lead and Contact page layouts with scoring categories and Pardot activities (Lead Activities tracking)
-
Matched Leads Lightning component for Account pages
-
Campaign History module for Leads and Contacts
-
Influenced Opportunities on Campaign layouts
-
-
Enable critical features:
-
Open Activities and Activity History related lists
-
Engagement History dashboards
-
B2B Marketing Analytics (if using Pardot Advanced)
-
-
Establish governance protocols—remove the Delete button from Leads to encourage proper lead disqualification workflows instead of data deletion.
Pro Tip: Many organizations skip proper campaign hierarchy setup and later regret it. Invest time upfront in designing a scalable campaign structure that aligns with your go-to-market strategy.
Step 2: Synchronize Pardot with Salesforce
Once Salesforce is configured, activate the bidirectional sync between your systems.
Implementation steps:
-
Enable the Pardot Lightning app sync with your Salesforce organization.
-
Establish the connection through Salesforce's native connector (the preferred method for Salesforce orgs)
-
If integrating with non-Salesforce CRMs (e.g., Microsoft Dynamics 365, NetSuite), use Pardot's API or third-party connectors like Zapier to build custom integrations.
Why This Matters: This sync is the lifeblood of your implementation. Without proper synchronization, you'll have duplicate data, missed opportunities, and reporting nightmares.
Step 3: Map Pardot and Salesforce Data — The Critical Bridge
Data mapping is where most implementations hit snags. This step requires meticulous attention to detail.
Key mapping activities:
-
Display Pardot information on Lead and Contact page layouts in Salesforce
-
Map standard Pardot fields to Lead and Contact pages
-
Create custom field mappings:
-
Pardot custom Lead fields → Salesforce Contact fields
-
Salesforce custom fields → Pardot custom fields
-
Salesforce user profiles → Pardot roles
-
-
Map all primary objects:
-
Leads
-
Contacts
-
Accounts
-
Opportunities
-
-
Transfer user management from Pardot to Salesforce for unified administration
-
Enable Pardot data visibility in Salesforce dashboards and reports
Implementation Insight: Document every mapping in a master spreadsheet. This becomes invaluable for troubleshooting, audits, and future enhancements.
Step 4: Manage and Unpause the Salesforce–Pardot Connector
The connector is your integration's control center. Configuration here determines which records sync and how.
Critical configurations:
-
Enable Connected Campaigns to sync campaign data bidirectionally
-
Define record types that will synchronize between systems
-
Create campaign sync rules that map Salesforce campaigns to Pardot campaigns
-
Configure marketing data sharing rules (available in Pardot Advanced/Premium editions)
-
Unpause the connector to activate live synchronization
-
Verify user sync to ensure all assigned users are properly synced
-
Establish custom roles and finalize user management transfer to Salesforce
Critical Checkpoint: Before unpausing, run a test sync with a small subset of records. Verify data integrity before going live with your full dataset.
Phase 2: Configuration & Data Harmonization (Steps 5-8)
Step 5: Enable Technical Pardot Setup — The Invisible Infrastructure
Technical setup is unglamorous but essential. This is where tracking, authentication, and deliverability are established.
Essential technical implementations:
Tracking & Data Collection:
-
Place Pardot tracking code on all website pages to capture every visitor interaction and campaign attribution
-
Set up opt-in tracking on your website for compliance and data privacy
-
Integrate Google Analytics tracking with Pardot forms on landing pages for enhanced attribution
Email Authentication & Deliverability:
-
Configure DKIM (DomainKeys Identified Mail) authentication to prove a legitimate email origin
-
Set up SPF (Sender Policy Framework) records to prevent email spoofing
-
Enable IP whitelisting to prevent company emails from landing in spam folders
-
Implement SSL (Secure Sockets Layer) encryption on all forms and landing pages
Advanced Customization (Optional but Recommended):
-
Implement CNAME records for Vanity URL setup, allowing you to host landing pages on your domain with personalized URLs (e.g., yourcompany.com/landing instead of pages.pardot.com)
-
Custom re-code forms, email templates, and landing pages for advanced styling and functionality
-
Integrate site search functionality with Pardot for enhanced tracking of customer research behavior.
Why This Matters: Poor technical setup is the #1 reason implementations fail. Companies that skip these steps experience deliverability issues, attribution gaps, and lost revenue.
Step 6: Create Prospect Segmentation and Scoring — The Engine of Personalization
Smart segmentation and scoring turn raw lead data into actionable intelligence.
Strategic implementation approach:
Segmentation Strategy:
-
Define your segmentation framework based on:
-
Industry and company size
-
Geographic location
-
Product/service interest
-
Buying cycle stage (awareness, consideration, decision)
-
Customer value potential
-
-
Create static lists for fixed segments (e.g., "Enterprise accounts in EMEA")
-
Build dynamic lists that automatically update based on behavior and attributes (e.g., "Engaged prospects who viewed pricing page 3+ times")
-
Decide on data import strategy—identify which existing customer datasets and third-party data sources to import.
Scoring Framework:
-
Define lead scoring categories that align with your ideal customer profile (ICP)
-
Create automation rules to adjust prospect profile grades automatically:
-
Engagement actions (email opens, page views, form submissions)
-
Demographic fit (company size, industry, location)
-
Implicit signals (content consumed, time on site)
-
Explicit actions (demo request, trial signup)
-
-
Set score thresholds that trigger lead routing to sales
Pro Strategy: Use a combination of explicit scoring (what prospects tell you) and implicit scoring (what they show you through behavior) for maximum accuracy.
Step 7: Create Forms, Email Templates, Landing Pages, and Content Assets
This step transforms Pardot from an infrastructure tool into a revenue-generating machine.
Key deliverables:
Landing Pages & Forms:
-
Design Pardot landing pages optimized for conversion with clear calls-to-action
-
Create reusable form templates with proper field mapping and validation
-
Implement custom page scoring to identify high-intent pages on your website
-
Set up conversion metrics and goals to track page performance
-
Add UTM tag tracking across all forms and campaigns for attribution accuracy
-
Enable Google Analytics integration on Pardot landing pages
Email Strategy:
-
Build professional email templates aligned with your brand guidelines.
-
Create dynamic and reusable content snippets (Pardot's answer to email modules) that can be used across multiple emails and campaigns.
-
Implement dynamic content blocks that personalize emails based on prospect segments.
-
Set up email preference centers for unsubscribe and subscription management.
Content & Asset Management:
-
Upload marketing assets (whitepapers, case studies, eBooks, guides) to Pardot's content repository
-
Configure custom notifications and scoring triggers when prospects engage with specific resources
-
Enable download tracking to monitor asset engagement and identify buying signals
Step 8: Import Marketing Assets
Asset management in Pardot streamlines content-based automation and attribution.
Implementation approach:
-
Upload all marketing resources (eBooks, guides, webinar recordings, whitepapers, case studies) to Pardot
-
Configure activity-based automation that triggers when prospects download or view assets
-
Set up custom scoring that awards points for high-value asset engagement
-
Establish analytics tracking to monitor:
-
Total downloads and views
-
Engagement history by prospect
-
Content performance by segment
-
Asset ROI
-
Business Impact: This creates a content intelligence system that reveals which resources drive the most qualified leads and pipeline.
Phase 3: Automation & Optimization (Steps 9-12)
Step 9: Automate Lead Assignment and Distribution
Lead routing determines how quickly sales engages prospects—and directly impacts revenue.
Strategic implementation:
-
Define assignment criteria in collaboration with sales leadership:
-
Geographic location and territory
-
Estimated account value (based on company size, revenue, industry)
-
Service domain or product line
-
Buying cycle stage and engagement level
-
Custom business rules specific to your sales process
-
-
Build lead processing workflows that automatically route leads based on these criteria
-
Create escalation rules for high-value prospects or accounts
-
Configure round-robin distribution for fair lead allocation when geography/territory overlap
-
Set up SLA tracking to monitor how quickly leads are engaged
Sales Enablement Tip: Get buy-in from your sales team on assignment criteria before implementation. Sales resistance is often due to poor lead-routing logic.
Step 10: Set Up Marketing Analytics
Analytics provide the visibility needed to prove marketing ROI and continuously optimize.
Set up requirements:
If you have Pardot Plus or Advanced editions:
-
Enable B2B Marketing Analytics (B2BMA) for enterprise-grade insights:
-
Assigned prospect tracking
-
Active website visitor analysis
-
Drip campaign performance
-
Revenue influence attribution
-
Campaign ROI analysis
-
Configuration checklist:
-
✅ Connect Campaigns configuration
-
✅ Campaign Influence 2.0 setup
-
✅ Contact Roles definition
-
✅ CRM user permission sets assignment
-
✅ Template permissions management (update quarterly after Salesforce releases)
Key Metrics to Track:
-
Cost Per Lead (CPL)
-
Lead-to-Opportunity Conversion Rate
-
Pipeline Influenced by Marketing
-
Customer Acquisition Cost (CAC)
-
Marketing-Influenced Revenue
Step 11: Integrate Systems — Extending Pardot's Ecosystem
Pardot's power multiplies when connected to your existing martech stack.
Popular third-party integrations:
Marketing & Analytics:
-
Google Analytics (website behavior insights)
-
Google Ads (PPC campaign attribution)
-
LinkedIn (professional targeting and ads)
-
AddThis Sharing (social engagement tracking)
Communication & Support:
-
Slack (instant alert notifications)
-
Twilio (SMS capabilities)
-
Olark (live chat integration)
-
Wistia (video engagement tracking)
Events & Webinars:
-
GoToWebinar (webinar registration and attendance tracking)
-
Eventbrite (event registration and management)
Content & Tools:
-
WordPress.org (blog integration)
-
Site Search (website search tracking)
-
Bit.ly (URL shortening and tracking)
-
UserVoice (feedback and idea management)
Integration Best Practices:
-
Test integrations thoroughly before full deployment
-
Establish data validation rules to ensure clean data flow
-
Monitor integration performance regularly
-
Document all integrations for troubleshooting and training
Step 12: Develop a Further Optimization Plan
Implementation isn't the finish line—it's the starting point. Identify optimization opportunities across:
-
Objects — Custom object configurations and relationships
-
Forms — Submission rates, field requirements, conversion optimization
-
Campaigns — Campaign structure refinement and hierarchy optimization
-
Email templates — Send-time optimization, subject line testing, design improvements
-
Landing pages — A/B testing, conversion rate optimization, load speed improvements
-
Filters & Tags — Taxonomy refinement and standardization
-
Reports & Dashboards — New metrics and KPI tracking
-
Automation Rules — Workflow enhancements and new trigger-based automations
-
Data sharing and validation — Data quality rules and governance policies
-
User security — Role-based access and permission audits
Create a 90-day optimization roadmap that prioritizes quick wins and high-impact improvements.
Phase 4: Testing & Validation (Step 13)
Step 13: Conduct Comprehensive Testing — The Quality Gate
Testing prevents costly errors from reaching your live environment.
User Acceptance Testing (UAT) Checklist:
☑ Tracker Implementation
-
Are tracker domains implemented correctly?
-
Is tracking firing on all intended pages?
-
Are visitor cookies functioning properly?
☑ System Integration
-
Is the Salesforce Connector correctly implemented and operational?
-
Are records syncing bidirectionally without errors?
-
Are field mappings accurate across all objects?
☑ Form & Landing Page Quality
-
Are all forms displaying correctly across devices?
-
Are there any styling issues or broken fields?
-
Do forms submit successfully and create/update records properly?
-
Are field validations working as intended?
-
Is reCAPTCHA or spam prevention functioning?
☑ Email & Communications
-
Are list emails and 1:1 emails being delivered and tracked correctly?
-
Are unsubscribe and preference pages working properly?
-
Is email authentication (DKIM, SPF) functioning correctly?
-
Are dynamic content blocks personalizing correctly?
☑ Campaign & Tagging Strategy
-
Is there a clear, consistent tagging strategy in place?
-
Are campaign reports accurate and in line with Salesforce data?
-
Are UTM parameters tracking correctly?
☑ Site Integration
-
Is Pardot integrated with your website's search functionality?
-
Are all third-party integrations syncing data correctly?
-
Is opt-in tracking properly configured?
Red Flag: If testing reveals major issues, pause the implementation and fix problems before proceeding. Going live with broken systems is far more expensive than delaying launch.
Phase 5: Enablement & Continuous Improvement (Steps 14-15)
Step 14: Develop User Training and Support Plan
User adoption determines your return on investment. Comprehensive training is non-negotiable.
Training Strategy:
Phase 1: Classroom Training
-
Conduct live, instructor-led training sessions organized by role (marketers, sales, admins)
-
Cover system navigation, core workflows, and common use cases
-
Ensure Q&A time for team questions
Phase 2: Self-Paced Learning
-
Provide recorded video demos of key Pardot functionality
-
Create step-by-step guides for common tasks (creating a campaign, launching an email, etc.)
-
Develop role-specific documentation (marketer guide, sales guide, admin guide)
Phase 3: Advanced Development
-
Create custom Trailmixes on Salesforce Trailhead (the official free learning platform) with curated lessons relevant to your implementation.
-
Host advanced workshops for admins who will oversee ongoing optimization and scaling.
-
Establish office hours for ongoing support questions.
Phase 4: Knowledge Management
-
Build an internal knowledge base or wiki documenting your specific configurations
-
Create a Slack channel or forum for peer-to-peer support
-
Designate super-users in each department to support teammates
Adoption Metrics to Track:
-
% of assigned users logging in weekly
-
Average usage sessions per user
-
Feature adoption rates
-
Training completion rates
-
Support ticket volume
Step 15: Extend Functionality — The Continuous Evolution
Pardot implementation doesn't end at go-live. The system should evolve with your business.
Continuous Improvement Framework:
Regular Review Cadence:
-
Monthly — Review key metrics, user feedback, and identify issues
-
Quarterly — Strategic planning for new features and optimizations
-
Annually — Comprehensive audit of configurations, ROI analysis, and roadmap planning
Feedback Mechanisms:
-
Conduct quarterly user feedback sessions with sales and marketing stakeholders
-
Monitor support tickets and common questions for improvement opportunities
-
Track feature requests and enhancement ideas
Enhancement Priorities:
-
New automation workflows based on business requirements
-
Advanced segmentation and targeting capabilities
-
Integration with emerging tools in your martech stack
-
Custom reporting and analytics needs
-
Lead scoring model refinements based on historical data
Success Indicators:
-
Increasing adoption and daily active users
-
Improving lead quality and conversion rates
-
Decreasing cost per lead
-
Higher sales team satisfaction with lead quality
-
Measurable marketing ROI improvement
Key Takeaways: The Pardot Implementation Philosophy
✅ Implementation is a journey, not a destination — successful organizations view Pardot as continuously evolving
✅ Data quality is the foundation — invest heavily in proper mapping, validation, and governance from day one
✅ User adoption drives value — comprehensive training and support are non-negotiable investments
✅ Testing prevents disaster — never skip UAT, no matter how tight your timeline
✅ Measure everything — establish clear KPIs and analytics from the beginning to prove ROI and guide optimization
Ready to implement Pardot correctly? The complexity is real, but the payoff—increased lead quality, faster sales cycles, and measurable marketing ROI—makes it worth the investment. Start with these 15 steps, stay committed to your implementation plan, and you'll unlock the full potential of marketing automation.
7 Mistakes That Kill Pardot Implementations
These are not hypothetical. These are patterns that appear in audits of broken Pardot setups. Each one reduces MQL-to-SQL conversion by 10 to 30 percent. Combined, they make the entire platform feel useless.
-
Mistake 1 — Scoring all activities equally. A blog post view and a pricing page visit should never have the same score. If they do, your "active" leads are readers, not buyers. Rebuild your scoring around intent layers.
-
Mistake 2 — No negative scoring or score decay. If scores only go up, a prospect who signed up for a newsletter two years ago and never engaged again will still have a high score. Implement decay rules and deductions for disinterest signals.
-
Mistake 3 — Ignoring lead grading entirely. Score-only MQLs get rejected by sales 60 to 70 percent of the time because the prospects "are not a fit." Grading is the ICP filter that prevents this. Require both score and grade to trigger an MQL.
-
Mistake 4 — Sending from a new domain at full volume. Jumping to high-volume sends on a new sending domain destroys your sender reputation. Warm up gradually over 4 to 6 weeks, starting with your most engaged segments.
-
Mistake 5 — Not enabling Connected Campaigns. Without Connected Campaigns, your Pardot campaign data and Salesforce campaign data live in separate worlds. You lose multi-touch attribution and the ability to see marketing's true influence on the pipeline.
-
Mistake 6 — Building automation before defining segments. Automation rules and Engagement Studio programs applied to the wrong segments send the wrong messages to the wrong people. Define your dynamic lists and segment criteria before you build any automation rule.
-
Mistake 7 — Not training the sales team. Marketing can build a perfect Pardot setup, but if sales does not understand what MQL alerts mean, how to read the prospect activity timeline in Salesforce, or why their feedback on lead quality matters, the system breaks down within 60 days.
The Bottom Line
Pardot is one of the most powerful B2B marketing automation platforms available in 2026, especially for companies already using Salesforce. But powerful and easy are not the same thing.
The difference between a Pardot implementation that generates a predictable pipeline and one that sits unused is rarely the platform. It is the sequence of decisions made before, during, and in the first 60 days after go-live.
Follow the eight steps in this guide. Define your MQL threshold with your sales team before you configure a single scoring rule. Clean your data before you import it. Set up email authentication before your first send. Build your scoring model around buying intent, not activity volume. Train your sales team, not just your marketing team.
Do those things consistently, and Pardot becomes what it was built to be: a growth engine that connects every marketing action to measurable revenue.
Work With Certified Pardot Experts — Get Results From Day One
If you are searching for a Pardot implementation guide chances are you are either starting fresh or trying to fix a setup that never delivered. Either way, the next step is the same: you need experienced hands who have done this before.
Our team specializes in Pardot implementation services, Salesforce Marketing Cloud Account Engagement setup, Pardot lead scoring configuration, Pardot Engagement Studio automation, and Pardot Salesforce integration for B2B companies across the USA and globally. Whether you need a full Pardot implementation from scratch, a Pardot audit and optimization, a Pardot migration from HubSpot or Marketo, or just someone to fix your broken sync and scoring — we have done it all.
We work with companies that are serious about turning Pardot into a real lead generation engine, not just a tool that sends emails. If that sounds like what you need, let us talk.
Book a free 30-minute Pardot consultation with our team—no pitch, no pressure — just honest advice on your next best step.
Book a Free Pardot Consultation
 0
0
About the Author